Tactics 101 067 – Decisions and the Decision Support Template
DECISIONS and
THE DECISION SUPPORT TEMPLATE
“The essential thing is action. Action has three stages: the decision born of thought; the order or preparation for execution, and the execution itself. All three stages are governed by the will. The will is rooted in character, and for the man of action character is of more critical importance than intellect. Intellect without will is worthless, will without intellect is dangerous.”
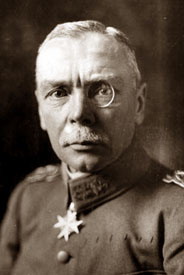
Colonel-General Hans von Seeckt
{default}LAST MONTH
In our last article, we dissected the matrix order. We looked at the history of matrix order. We analyzed the virtues of the utilizing this tool and just as importantly, the shortcomings. Within the article, we provided you our rules when crafting a matrix order. We spent the majority of the article highlighting an example of a matrix order you could use as a template. Remember:
Matrix orders are powerful tools in the hands of experienced leaders who know how to plan and communicate mission orders. He uses the tool to; help manage time, as a memory jogger, to discipline the military decision making process (MDMP), and to condense and present complex orders. When used properly, they augment tempo. When misused, they cause confusion and leave critical gaps in operational plans.
THIS MONTH
One of tools that continually has come up in our series is the Decision Support Template (DST). Obviously, timely decisions are critical on the battlefield. If you have anticipated the potential of certain decisions – all the better. The DST is a tool you develop in the planning process which assists you in making a timely and anticipated decision. Our article this month will delve into the DST. We will touch on several areas which should aid you in your understanding of the DST and how you could utilize it. These include: 1) A historical perspective on decisions. 2) A review on data and information. 3) A definition of the DST. 4) The components of the DST. 5) A practical example of a DST. 6) Conclude with another historical example. Let’s begin.
Decision making is what command is all about. It is command. No matter how well conceived a plan is; decisions will have to be made along the way. There’s no way around it. As Von Moltke the Elder so astutely noted, “No plan survives contact with the enemy.”
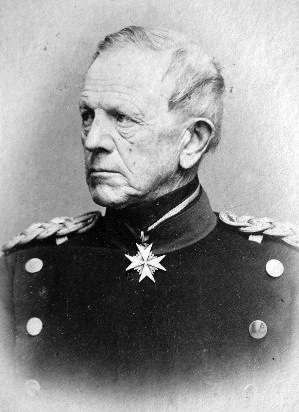
Von Moltke the Elder
There are three ways for the commander to contend with his role as a decision maker;
− Immediate cognition; meaning you’ll know what to do when the time comes. This is the realm of experience and military genius.
− Set the plan in motion and allow it to play out as is, relying on junior leaders to make minute course corrections as needed. This can work against an unimaginative foe, but it generally falls under the ‘let’s hope for the best’ category—luck.
− Predict and define the potential key moments where a decision could be required. This is the analytical ‘what if’ drill designed to identify as many realistic permutations as possible.
Since genius is scarce and hope is not a method, we’ll look to the third option—analysis. It’s not as hard as it seems. But first, a little historical context …
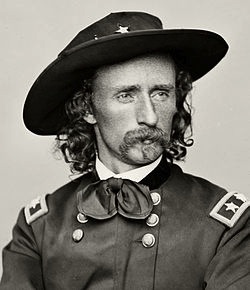
George Armstrong Custer
Custer 1868. In Nov 1868, George Armstrong Custer’s 7th Cavalry was ordered to conduct a winter offensive against the Cheyenne Chief Black Kettle. Custer was to find and raid his village along the Washita River.
As the 7th moved southeast, the scouts picked up a war party trail and followed it to the village. When Custer arrived, he organized for battle by dividing his regiment into four subunits. He would recon the village over night and attack at first light.
When his columns struck; the warriors fled, the village fell, and Chief Black Kettle was killed. Some troopers began rounding up villagers, while others pursued the warriors into the surrounding woods and hills. One of the latter groups was led by Custer’s second in command, MAJ Joel Elliot. The sound of the firefight coming from his detachment was more intense than expected. Custer’s scouts began to report that there were more Indians in the hills than there should have been. One scout suggested that Black Kettle’s village was one of many along the river and that there were many more warriors headed their way—the 7th Cavalry might soon be outnumbered.
Custer’s first impulse was to continue his attack, but he changed his mind and ordered defensive preparations to cover the final clearing of the village. He finally decided on a withdrawal, but not while the warriors were watching, he didn’t want to be pursued. He decided to visibly march on the unseen villages at nightfall to force the warriors to head back to their defense. At midnight, he’d do an about face with his captives withdrawal.
It was a sound plan and it worked. The 7th Cavalry dodged a bullet, or an arrow. Custer lost 21 men at the Washita with 13 more wounded. Twenty of the dead came from MAJ Elliott’s detachment. He ran into and was overwhelmed by a party of Cheyenne, Kiowa, and Arapaho from the neighboring villages. Custer seemed to have been more worried than he let on since he departed without determining the fate of Elliott’s detachment. Elliott’s friend, CPT Frederick Benteen, never forgave Custer for Washita.
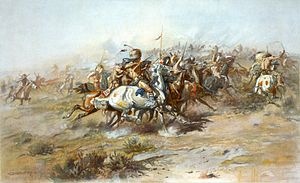
Battle of the Little Bighorn
Custer 1876. Eight years later, Custer and the 7th Cavalry were on another campaign. This time the enemy was a Lakota Sioux Chief named Sitting Bull and his warriors. Custer’s unit was one of three that would participate. One column came from the northwest, another led by Gen George Crook came from the southwest and Custer came from the east. Unfortunately, Crook didn’t tell his fellow commanders that his column had made contact. It had been hit hard, but held its ground. It also withdrew, unnerved by the fury and size of the Indian response.
Custer’s boss was BG Alfred Terry, the actual commander of the 7th. Terry’s plan was for Custer to take the 7th south along the Rosebud River. Custer was to bypass Sitting Bull’s village, thought to be along the Little Bighorn west of the Rosebud. Custer would then swing around to the east and envelop Sitting Bull from the south. Terry and the northern column would attack from the north, thus putting Sitting Bull in a vice. The 7th had already scouted the area while moving north to link up with the northern column. Reports indicated that Sitting Bull’s village was the largest one the scouts had ever seen.
Custer didn’t like Terry’s plan. He feared that Sitting Bull would detect his column and would slip away. He wanted to attack as soon as possible. Once Custer found the trail left by the mobile villagers, he followed it east towards the Little Bighorn rather than continuing south as ordered. Once again, Custer’s scouts spotted portions of what seemed to be a large village, but the rolling terrain made a detailed report impossible. Custer thought he’d surprised Sitting Bull just as he’d surprised Black Kettle. He thought the warriors were hunting buffalo leaving the village undefended.
Just as at Washita, Custer decided to spend the day scouting in preparation of a morning attack. His plans were dashed when it was discovered the 7th was being tracked by a small group of Indians. Custer feared the village would be warned and would flee so he ordered an immediate attack. He divided the 7th into three subunits and the supply train for the mission.
The first battalion, led by MAJ Marcus Reno, was ordered to attack the village from the south bank of the Little Bighorn River. The second battalion, led by CPT Frederick Benteen, was to move to high ground in the south to get a better look at the village. It was there that they would rejoin Custer’s third battalion which would attack the village from the north bank of the Little Bighorn. A Troop escorted the trains.
Reno began his attack without knowledge of the village size, location, or number of defenders (not a good thing). He crossed the Little Bighorn and found more warriors than imagined and they weren’t running away. He advanced until he found his battalion was within bow range of the Hunkpapa Sioux village—a sub-village within the larger encampment. Reno ordered his troopers to form a skirmish line with every fourth man holding the horses. This reduced his firepower by 25 percent and initial volleys alerted the village. Warriors out of range had time to rally and move towards Reno. After 20 minutes or so, Reno had taken only one casualty, but the odds against him were growing to as much as five to one. Two counter-attacks struck Reno’s front and left forcing him to withdraw to the wood line along the river’s edge. The Indians followed and forced him cross back over the Little Bighorn and move to a defensible hilltop. He lost three officers and 29 troopers during the retreat.
Benteen’s Battalion joined Reno after failing to find a vantage point overlooking the village. A message from Custer ordered Benteen to, “come on…big village, be quick…bring pacs,"; "pacs" being the ammo from the trains. Custer seems to have found a large number of Indians and was preparing his attack. Benteen’s arrival came in the nick of time for Reno on the hill north of the river but he decided not to ride to Custer. Benteen was vocal about his belief that Custer had withdrawn leaving Reno as he had left Elliott at Washita.
Despite hearing heavy gunfire from the north, Benteen stayed with Reno on the hill. Benteen’s subordinate, CPT Thomas Weir, decided to reinforce Custer against orders. His Troop rode north about a mile to a ridge where they could see warriors in the distance shooting at objects on the ground. Weir was probably seeing Sitting Bull’s warriors finishing off Custer’s Battalion on the ‘Last Stand Hill’. The other Troops on ‘Reno Hill’ followed Weir. Fresh attacks quickly forced Reno and Benteen to return to their previous strongpoint where they remained pinned down for another day. Reno was unaware of what had happened to Custer until Gen Terry arrived. They were stunned by the news. When they examined the battle site they couldn’t tell what had happened. Custer had been attacked about 3.5 miles to the north. Custer may have thought he had a hammer-and-anvil envelopment with Reno in the south and his force in the north. He was wrong.
These two battles are very similar. In both cases, Custer found himself attacking a satellite village without knowledge of its relation to other villages or the size of its defending force. He had lost contact with a subordinate unit in both cases and that subordinate had found himself in a desperate fight. At the Washita, the subordinate was wiped out. At the Little Bighorn, Custer and the main body was wiped out. Had Custer and his subordinates planned out their decisions; they may have known what to ask, when to ask it, and what decisions to make.
Data and Information
Data is nothing more than unfiltered facts and, in and of itself, tells the commander little. For example; a report of a large village has little value on its own. When bits of data are aggregated, organized, and presented in a holistic fashion, they become information. The village report begins to mean something when it’s added that it contains 200 teepees and has a nearby herd of 100 horses. It means even more when it is added that there is another cluster of teepees to the north… The information begins to morph into knowledge and understanding and becomes the basis for decision making.
Image Building and Execution Information
There are two types of information. The first and most common type of information is image building information. This type of information helps the commander build a mental picture of his surroundings and situation. This is stuff that’s nice to know, but not necessarily essential. Image building information relates data about size, location, and composition. Execution information informs a decision by relating image building information with activity—the so what.
The Decision Support Template (DST)
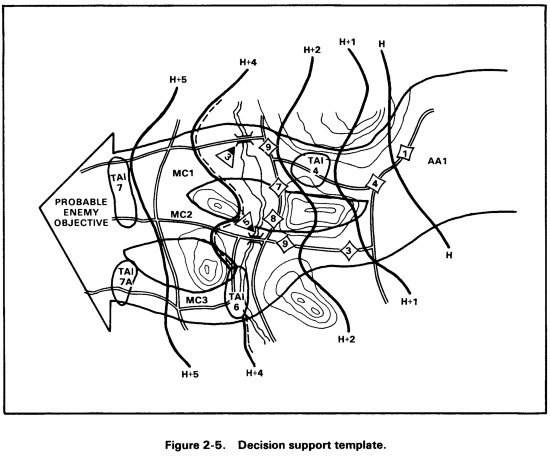
So how do we sort through the data and information to find what we’ll need to make a decision? To do that, we’ll create a Decision Support Template. A DST is a representation of the commanders war-game; his visualization of how a mission will/might unfold. The DST identifies decision points, timelines associated with movement, and key items of information required to execute a specific course of action.
A DST is like diagramming a football play. You review game film to see what you do well and what the other team does well. You decide that in a 3rd and 9 situation, you should pass to receiver A. If he’s covered, then you’ll go to receiver B and if he’s covered you go to C, your safety valve. If they rush and leave the middle open, then you’ll scramble. In other words; you lay out your play as designed then look at what the other team can or could do to beat it. Based on your plays and their counter-plays, you develop options for your players. The players then learn the ‘reads’ that trigger their actions. So, a DST is similar to a game plan.
COMPONENTS OF THE DST
Named Area of Interest (NAI)
A NAI is a geographical area where information that will satisfy a specific information requirement can be collected. Named areas of interest are usually selected to capture indications of adversary courses of action, but also may be related to conditions of the battle-space.
A named area of interest is a location you will watch where the enemy’s action will broadcast his intent and thus, inform your ‘read’ or decision to act. When Reno dismounted outside the village he signaled his intent to attack by fire rather than to charge the village on horseback—the latter being the more dangerous option for a village caught unawares. Since he stopped and set up a skirmish line, the Indians knew they had time to rally and select a counterattack route. Had Reno charged the village, the Indians would have had to evacuate or defend their families teepee by teepee.
Targeted Area of Interest (TAI)
A TAI is the geographical area where a high-value target can be acquired and engaged. Not all targeted areas of interest will form part of the friendly course of action. Only target areas of interest associated with high priority targets are of interest to the commander. Target areas of interest differ from engagement areas in that engagement areas plan for the use of all available weapons and TAI’s might be engaged by a single weapon.
During Custer’s battle, one of Sitting Bull’s leaders looked for where the horses were being kept while troops were dismounted. Once he found them, he attacked them in order to scare them and leave the troopers without their mounts. He succeeded. If a modern commander wants to prevent the enemy from using a bridge, he may make it a TAI and watch it to see if the enemy intends to use it in which case he may blow it. If they don’t use it then he may leave it in place so his own forces can use it in the future.
Time Phase Line (TPL)
A TPL is a series of locations on the ground used to measure the rate of movement. If you are going to trigger the demolition of the bridge stated above, you have to factor in when you determine the enemy is headed to the bridge, how long it will take him to get there and how long it will take your fuses to set off the charges. It is obviously useless for the bridge to collapse after the enemy has crossed it. Therefore, when the enemy passes a given point on the ground travelling at his known rate of advance, then you have to initiate the charge to drop the bridge before he gets across. This is clearly part art and science!
Decision Point (DP)
A DP is the choice that must be made by the commander; flee the village, defend in place, or rally for counterattack. When the NAI broadcasts the enemy’s intent and the TPL indicates when he’ll be in place; the decision must be made.
Commanders Critical Information Requirements (CCIR)
NAI’s TAI’s, TPL’s and DP’s are placed on the map so we know where to look. They are fed by the Commanders Critical Information Requirements. CCIR is information the commander needs to make informed decisions and that dictates the successful execution of operational or tactical operations. CCIR normally is broken down into three types of information requirements: priority intelligence requirements, essential elements of friendly information, and friendly force information requirements.
- Priority Intelligence Requirements (PIR) are those intelligence requirements for which a commander has an anticipated and stated priority in his task of planning and decision making. For example:
- Will the 7th Cav attack to the North of the Little Bighorn or to the South
- Will he attack mounted or from a skirmish line?
- Friendly Force Information Requirements (FFIR) is the information about the forces available that informs the commander’s decision making. If Custer and Terry had known about Gen Crooke’s battle they may well have decided to conduct their operation in a different manner.
- Essential Elements of Friendly Information (EEFI) includes the critical aspects of a friendly operation that, if known by the enemy, would compromise, lead to failure, or limit success of the operation, and therefore must be protected from enemy detection. Sitting Bull didn’t want the Cav to know how many warriors he had and the Cav didn’t want Sitting Bull to know their direction of attack.
For more discussion on CCIR, please read this outstanding article!
http://armchairgeneral.com/tactics-101-014-decision-making-and-the-power-of-commanders-critical-information-requirements.htm
Practical Example
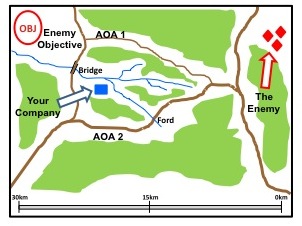
Let’s put it all together. In this scenario, we are on the defense. We are opposed by an enemy battalion consisting of three motorized companies. They are moving east to west through restrictive terrain and are limited to road movement. Their goal is to pass through the woods and take an open area to the east.
We are a light infantry company defending forward of a larger defensive position that is being prepared. We are required to slow down the enemy attack and attrite their combat power. We are supposed to ambush his column while it is trapped in the dense terrain. Our problem is that we don’t have enough combat power to establish significant ambushes along both east-west routes (AOA 1and 2) and we are pretty sure the enemy will use both roads. We can hit one hard and hinder the other.
The enemy will most likely use both routes, but he will place two companies on the route he plans for his main attack. A single company will travel on the secondary route as a supporting attack. We must put the bulk of our force in a central location and we must ID the main attack route with sufficient time to move the bulk of our force to the main ambush.
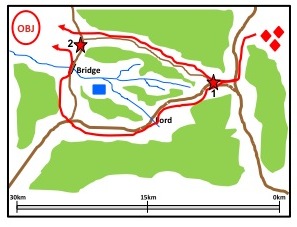
The enemy can take the northern route, the southern route or both. If he takes both, he’ll place two companies on the main attack axis and one on the supporting attack axis. We will know his intent at Decision Point (DP) 1. (Decision Points are designated by a red star). Red DP 2 identifies how the attack will be executed once the enemy has cleared the woods.
The northern route is not as trafficable, but it is more direct. The southern route is more trafficable, but it is indirect and requires the unit to cross a ford site and a bridge to get to the final objective. As the commander, you decide that you think he will send two companies on the northern route and one on the southern route. You’ll know when you see the trail company turn north or south.
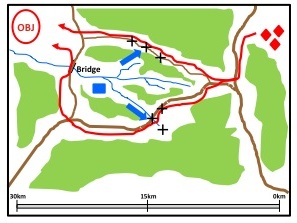
Our plan is to ambush the northern column along the narrowest part of the road while using artillery to break up his forces. We will ambush the southern column at the ford site using artillery to hit them in the ford, while they are waiting to ford and to hinder those trying to bypass the ford. We will send two thirds of our combat power to the enemy’s main route and one third to his supporting route. We will prioritize artillery to the enemy main attack and use mortars against the supporting attack.
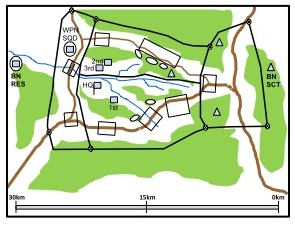
Our plan is to position the bulk of our force to the north where the commander thinks they will most likely be employed—two platoons north of the creek and one to the south. We will place our weapons squad to the rear in Humvees where they can use the major North/South road to deploy where needed. The Battalion reserve is to our rear in the north and a battalion scout is to our front. We have engagements throughout the area (designated by the boxes). We will initiate fires in from our ambush positions and will then use the other EA’s for harassment indirect fires. How does our DST support this plan?
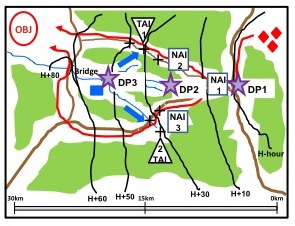
Here’s our DST. DP1 is where the commander decides whether to weight the north or south. The decision is based on what the scouts see at NAI 1—does the enemy send everyone north, south, or split; and if he splits, which route gets two companies.
DP 2 is the commander’s decision to direct artillery support against the trail company. NAI 2 tells the commander where the trail is and NAI 3 tells the commander if the enemy is trying to bypass the ford site. NAI 2 triggers fires on TAI 1 and NAI 3 triggers TAI 2.
DP 3 is really a decision point for the Battalion Commander. This is the decision to utilize the Battalion reserve. Once the enemy gets a company or larger past the H+50 TPL, we will call the Battalion Commander. This will initiate the action of the reserve to meet the enemy as they emerge from the woods and destroy them along the main north/south road.
To assist the Commander in making these timely decisions, he must have effective CCIR. Our CCIR will help decide whether to weight the north or south. We must see the enemy’s action at his DP, the fork in the road. We need to have enough time to move into place and get the priority of fires shifted and to emplace the mortars for the supporting ambush. We have determined CCIR as follows:
PIR:
− Which route will the enemy use?
− If he uses both, which one will accommodate the main attack (two companies)?
− Will he stagger his forces or move them abreast?
− Will his forces attempt to cross over from one route to the other once committed?
− Will there be rain that might swell the river?
FFIR:
− When will friendly direct artillery be in position to support us?
− How long will it take the Weapons Squad to reposition from the north to the south?
EEFI:
− Location of the company hide position
− Location of our ambush locations
− Location of Friendly Observation Posts
− Location of the Weapons Squad
When the commander and the staff takes the time to wargame their fight, look at their options, and look at threat options, they can predict critical points in the fight. These critical points will call for key decisions and since they will be anticipated, they need not be a surprise. Think back to Custer:
− Where is Sitting Bull’s village and is it a standalone or part of a network?
− How many non-combatants are there?
− How many warriors are there? How many horses?
− What is the terrain like?
− Can I conceal my approach?
− Where are the other columns and how long will it take them to join me if I am engaged?
There are plenty more questions that could have been preloaded. The idea that the commander can instantly make an intuitive, on the spot, decision is folly. Any commander who charges in the blind and tries to make a decision under pressure is as likely to be wrong as not.
Another Example in History
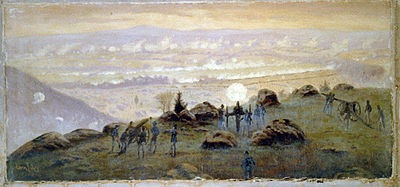
Little Round Top
Little Round Top
As Gettysburg unfolded, Colonel Joshua Chamberlain was given the enormous responsibility of defending the Union southern flank. He was told that if his position fell, the Union left would be rolled up.
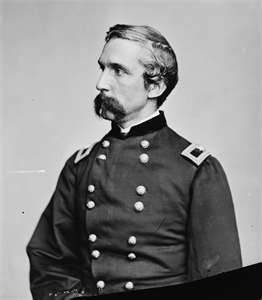
Colonel Joshua Chamberlain
Across from Chamberlain was BG Evander Laws’ Alabama Brigade. Law sent the 4th, 15th, and 47th Alabama, and the 4th and 5th Texas to take Little Round Top. The men had marched some 20 miles already and it was hot. Many of them had moved out before they could refill their canteens. The first assault was repulsed so the 15th Alabama under Col William Oates attempted to find the Union left flank; Chamberlain’s 20th Maine and the 83rd Pennsylvania. Seeing the Confederates moving to his flank, Chamberlain stretched out his line to single-file and then ordered the southern portion to pivot back in a maneuver called "refusing the line". In the face of heavy fire and heavy losses, the 20th Maine held through back to back charges spanning an hour and a half.
As the final charge began, Chamberlain assessed his situation.
− He had sustained heavy losses
− His men were running out of ammunition
− The regiment could not withstand another charge
− He also figured that if his men were exhausted defending from stationary positions, the enemy must be even more so since they had to climb Little Round Top for each attack
− He also figured that the enemy was also low on water and ammunition
Chamberlain decided the time was right for an antiquated bayonet counter-attack. He ordered his left flank to advance in a "right-wheel forward" maneuver and as soon as they got on line with the rest of the regiment, they’d all charge down the hill. The near simultaneous frontal assault and flanking maneuver sent the 15th Alabama reeling.
Chamberlain considered PIR when he figured the enemy was as tired as he was. He considered FFIR when he figured his position could not hold out and that the flank could be rolled up if he collapsed. He considered EEFI when he moved his flank to refuse the line and he considered terrain knowing he’d be moving downhill during the counterattack. He may not have had a formal DST, but he went through the logical process all the same.
REVIEW
A DST is a powerful decision-making tool. If it is well-thought out during planning; it can be the difference between winning and losing. In our article, we described the components of a DST and how in combination they are utilized. A Commander who goes into battle without a DST is not setting the conditions for success. You must go into a fight with everything you have available to you. We hope this article exposed you to a tool you will want to use on your battlefield.
NEXT MONTH
In our next article, we will focus on task organizations. We will look at this subject from both the art and science angles. From the art angle, we will look at how a commander determines his task organization. We will touch on the variables that come into play. From the science side, we will show you how you formally depict a task organization according to doctrine. Additionally, we will provide some techniques to display task organizations.

