
Tactics 101 033 – Obstacle Planning
OBSTACLE PLANNING – “A WAY”

… the defense has the advantage of being able to choose its own ground, and often, where there is plenty of room at its disposal, of even prescribing the time when its adversary must attack. The defense waits upon attacker. Its object is to conserve resources and to break down the attack of the opponent. If it wishes to avoid a decision, it moves away from the enemy, as far as time and space permit; it will drag the action out. As an attack proceeds, the attacker’s resources diminish; he becomes weaker and wears himself out.
{default}COL R. Ernest Depuy and COL Trevor N. Depuy
LAST MONTH
In our last article, we focused on some concepts critical in understanding the art and science of obstacle emplacement. The most important concept we addressed was the necessity for a Commander to articulate to his staff the specific effects he wants obstacles to achieve for him. We emphasized this effect must be understood so the ‘experts’ can properly utilize a unit’s assets to construct an obstacle system accomplishing the effect. This in turn, sets the conditions to greatly increase the lethality of a unit’s indirect and direct fire systems. This increased lethality truly improves a unit’s ability to accomplish their assigned purpose and task. It seems so simple on paper! However, we know it is far more complex on the ground.
THIS MONTH
We will build on last month, by providing “A Way” on actually planning obstacles. Key to remember in this process is that it is not conducted in a vacuum. Obstacle planning is done in conjunction with the planning you conduct to develop your defense. Within a unit (depending on the size), you will likely have available an engineer planner to assist in this endeavor. However, the majority of the ACG Commanders will not have that luxury when you plan on your battlefield. So take heed and hopefully the following process assists you when planning your next defense.
“A WAY”
The process we will discuss is not a lock-step. In other words, you do not have to complete step 2 before you move to step 3. Several of the steps can and should be done concurrently.
Step 1 – Mission Analysis
As we have said numerous times; it all starts with mission analysis. You must understand yourself, your enemy, and the terrain to enable you to develop a plan that can be effective if executed efficiently.
See Tactics 101: 002. The Importance of Mission Analysis in Planning » ArmchairGeneral.com
Within mission analysis, there are certainly critical pieces of information that must be analyzed in order to develop a relative obstacle plan. Below we will highlight the questions (and why it is important in relation to developing your obstacle plan) that must be addressed during mission analysis as they pertain to developing an obstacle plan. We will divide them by understanding yourself, the enemy, and the terrain.
UNDERSTANDING YOURSELF
What is your purpose and task? (It all starts with your mission. Knowing this will provide you the understanding of how obstacles fit into the scheme).
What is the initial defensive plan? (This highlights initial engagement areas, battle positions, and locations of weapon systems. They may likely change as planning and preparation continue. However, these are the elements that driving obstacle emplacement).
When is your no later than (NLT) time to be prepared to execute your task and purpose? (This is critical in determining how much time is available to emplace your obstacles. Time is the enemy when emplacing obstacles. There is never enough of it!)
What are friendly forces doing around you? (It is imperative you understand the maneuver plan and obstacle plan of the units around you. These can influence your planning, preparation, and eventual execution).
What obstacles has your higher headquarters tasked you to emplace? (In many cases, you will be required to construct obstacles in support of your higher headquarters’ plan. This is critical for several reasons. First, the future locations for these obstacles affect your maneuver and obstacle plan. Second, your emplacement of these obstacles consumes some of your resources (particularly Soldiers and time!)
What restrictions has your higher headquarters placed on you in regards to obstacle types, duration, etc…? (Based on current and future plans, the higher headquarters may place restrictions on various aspects of obstacle emplacement. These restrictions include prohibited obstacle locations, types of delivery systems to emplace mines such as artillery and close air support, and the time duration of mines. These restrictions must be understood early in the planning).
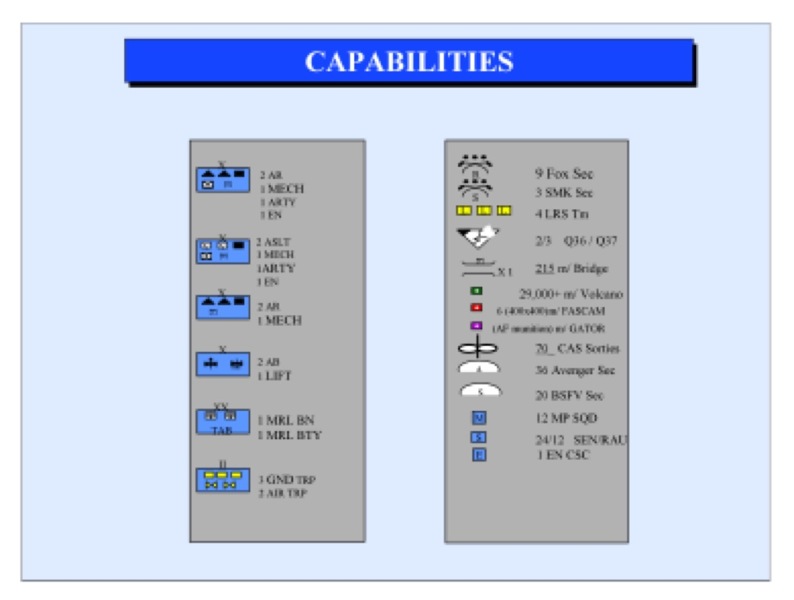
What is your task organization to achieve your mission? (You must know what you have available as soon as planning begins. The majority of this comes from the task organization. Additionally, you may be allocated other resources by your higher headquarters Operation Order such as FASCAM and other mine delivery means).
What is your experience in emplacing obstacles? (Certainly, the more experienced your personnel are in emplacing obstacles the better in terms of the time needed to emplace obstacles and the likely quality of the obstacles. You must know your strengths and more importantly, your shortcomings).
What is available in terms of materials? (You must conduct a preliminary look at what is available resource-wise to construct obstacles. This includes items such as wire, pickets, mines, etc…. You must know right away if you have any glaring shortages. Just as critical knows the location of your materials. As you know, the further away they are; the longer it will take to get them where you need them).
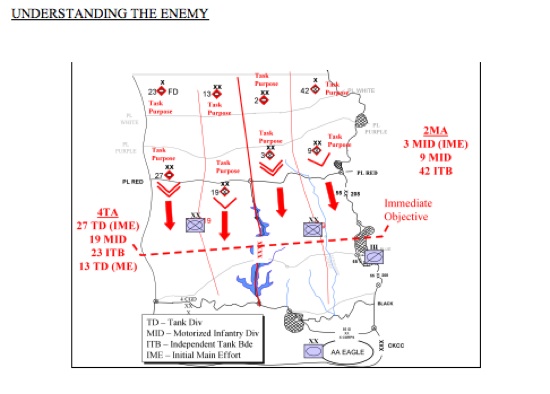
What do you believe the enemy’s mission is? (The understanding of the enemy’s mission assists you in forecasting his likely maneuver formations, his task organization, and most importantly, his attack timeline).
What are the enemy avenues of approach? (You want to determine to the best of your ability where he is going! After all, you do not want to expend valuable resources in emplacing obstacles on terrain the enemy will never maneuver upon. Ensure you analyze mounted, dismounted and air avenues of approach).
What are his breaching capabilities? (Based on your archived information and current intelligence, you must anticipate what your foe has in regards to breaching equipment. If he has shortages or is vulnerable to certain types of obstacles – exploit it!)
How skilled is your enemy in reconnaissance operations? (One of the major objectives of recon units preparing for an attack is to locate the obstacles emplaced by their opponent. If the enemy has capable recon operations, you must make it difficult on him. This includes highly planned and executed counter-reconnaissance efforts and solid security of your obstacle emplacement preparation).
Where does he emplace his breaching assets? (Knowing where an enemy places his breaching assets in a formation is of great value in how you construct particular obstacles. It also assists in targeting, so you can focus your indirect fires on destroying his breaching assets).
Does the enemy have established breaching doctrine? (If so, this is a start for you to study).
How has he reacted to obstacles in the past? (Using doctrine as a base, study your enemy’s past record in breaching obstacles. Are there any trends? If he tips his hand, make him pay for it!).
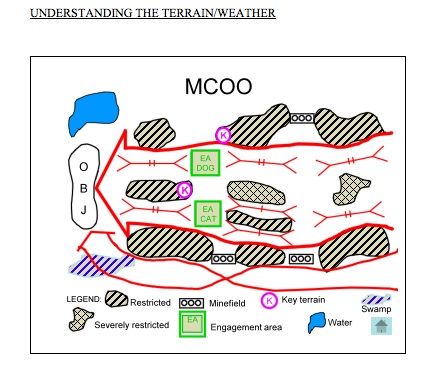
What is the location of existing obstacles such as hills, mountains, and water features? (As we discussed in our last article, you must utilize existing obstacles to their utmost. Tying in your constructed obstacles to existing obstacles makes them far more effective).
Is there key or decisive terrain for you or your enemy? (If so, well-placed obstacles can assist you in attaining or retaining the terrain or assist you in making it difficult for your opponent to seize the terrain).
What is the current or future weather? (Weather can significantly impact so many things in the obstacle arena. For example: 1. Extreme heat and cold dramatically affects Soldiers’ ability to physically emplace obstacles. 2. Extreme heat and cold can severely degrade your mechanical assets ability to emplace obstacles. 3. Heavy rain can practically stop transportation in some types of terrain. The end result is that you can not transport obstacle materials where you need them. Additionally, it can also limit your opponent’s maneuver options, thus affecting your potential obstacle locations).
Where are the observation and fields of fire in your defensive area? (As addressed in detail in earlier articles, obstacles must be synchronized with indirect and direct fires. Understanding observation and fields of fire assists in this synchronization).
Where are the areas of cover and concealment located in your defensive area? (Blending in obstacles with the terrain that has plenty of cover and concealment potentially makes your obstacles more effective).
Step 2 – Commander’s Guidance
See Tactics 101:028 – Commander’s Guidance » Armchair General
Following mission analysis, a commander must have enough knowledge and understanding to provide quality guidance to his staff. In terms of obstacles, there are some critical areas the commander must address which drive obstacle planning. Within these areas, the two most critical pieces of guidance are the overall intent of the obstacle plan and the effects he wants to achieve with certain obstacle systems. Let’s discuss each.
In regards to overall intent, the commander should detail how he envisions obstacles contributing to his success. He should discuss how obstacles will be synchronized with his other resources (particularly indirect and direct fire systems) to assist in accomplishing his mission. This intent will drive all other planning.
The second critical piece of guidance is the specific effects he desires his obstacles to attain. As we stressed in our last article this is crucial in emplacing obstacles. It is the effect that is essentially the blueprint for how obstacles will look on the battlefield. The work done in Step 1: Mission Analysis sets the conditions to determining which effect or effects are needed during the defense: disrupt, fix, turn, and block. As a review:
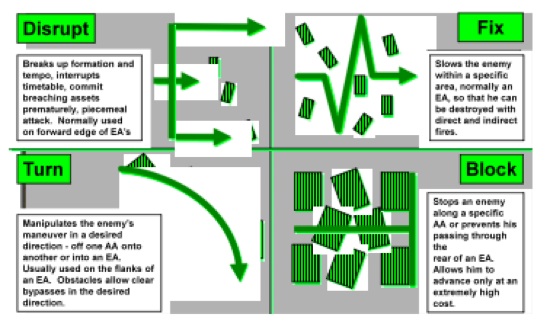
The determination of the effect also begins to lay out the specific requirements in relation to the amount of obstacles needed. This is because each effect, based on analysis, requires a different amount of resources to achieve. For example, if you remember in our last article, the block effect is the most demanding and thus, requires more resources to emplace. On the other hand, the disrupt effect is not as demanding and consequently, involves less resources to emplace than block.
With this guidance in hand (and in head), we can begin to formulate where we want to emplace obstacles to achieve the desired intent and effects.
Step 3 – Obstacle Locations and Types (Unconstrained)
With an understanding of the intent and the effects required, it is now time to get to the map or the computer. It is here you will begin to sketch out where you will initially emplace your various obstacle systems to achieve the intent and effect. At this time, let your marker or keypad go wild (within reason of course). You will select locations and types of obstacles in an unconstrained environment that you would like emplaced. This is of course is best casing. Why unconstrained? Well, this provides you analysis and a subsequent product that can be utilized later when conditions change on the battlefield (which they will for better or worse). Armed with your unconstrained product; you can now begin to prioritize.
Step 4 – Determine Priorities
It is now time to take that unconstrained product and prioritize. There are several factors that enter the equation when you begin prioritizing. Let’s address some of the more critical ones.
- What are the directed obstacles you received from your higher headquarters? These are non-negotiable unless you can successfully get relieved from emplacing them. Since they are tasked to you; they are a high priority.
- Where are obstacles going to best support you in achieving your purpose and task? After all, the bottom line is accomplishing your mission.
- What was the commander’s intent for obstacles and the effects he wanted obstacles to achieve? If is a priority to the commander; it is a priority for you!
- Based on your defensive plan, where can obstacles best be synchronized with direct and indirect fires? If an obstacle is not or can not be synchronized with fires it is not an efficient use of the critical resources it takes to emplace them.
With the above and other factors, you will prioritize your unconstrained list. There are numerous techniques you can utilize to prioritize. Two of the most common follow: First, you may use a simple numerical ranking of your obstacles. In this case, your most important obstacle would be ranked number 1; your second most important obstacle to be emplaced is ranked number two, and so on. Second, you may employ a categorical system of prioritization. In this technique, you may label obstacles as “must have,” “have,” and “nice to haves.” Thus, you have three defined categories for the future emplacement of obstacles.
Put your prioritization list to the side for just a moment. You will come back to it shortly.
Step 5 – Determine Resources

As we are all painfully aware, resources are finite. This is certainly the case in the area of obstacle emplacement. Within any unit there is a limited amount of obstacle materials, equipment to emplace these materials, Soldiers to emplace these materials or run the equipment, and time. In determining your resources there are two parts. First, you must identify what you have physically available to emplace obstacles. Most of this work was done during your mission analysis when you began to understand yourself. Second, you must determine what your resources are capable of achieving in terms of emplacing obstacles. Once again, smart people have done calculations for our use. Use these numbers as a start point and make changes based on your personnel situation.
Below we address these most critical resources.
1. Engineer Assets. Obviously, engineer assets are vital in constructing obstacles. They are of course experts in emplacing obstacles and are equipped with specially developed resources to emplace obstacles. Engineer vehicles can be used to lay mines, dig tank ditches, emplace pickets and wire, etc…. Because of this, they are huge time-savors and enable you to utilize your other Soldiers in other areas. There are many tables you can use to determine what these assets are capable of accomplishing. Below is an example of the “science” of obstacle emplacement from years past. Do not worry about what it all means! The point is that a great deal of the serious number crunching has been done and is available.
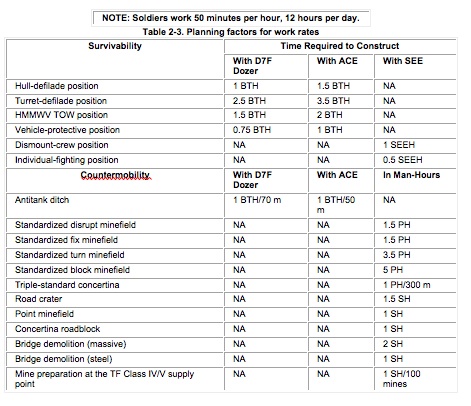
LEGEND:
BTH (blade team hour). One blade team working for one hour. A blade team consists of two engineer blades (two dozers, two ACEs, or one ACE and one dozer). One vehicle digs (cutter) while the other spreads the spoil (striker). A dozer-ACE blade team uses the dozer BTH.
SEEH (SEE hour). One SEE working for one hour.
PH (platoon hour). One platoon (3 squads) working for one hour.
SH (squad hour). One squad working for one hour.
2. Soldiers Available to Emplace Obstacles. Your engineers can only do so much on the battlefield. Thus, units must use other Soldiers (predominately Infantryman) to assist in obstacle emplacement. These Soldiers can string wire, pound in pickets, and even emplace and arm certain mines (not the best duty!). Good leaders know how to best utilize these Soldiers in constructing obstacles. More importantly, they know where the burn-out point is for these Soldiers. Make them do too much and they will not be physically or mentally ready when you need them.
3. Soldiers Available to Secure Obstacles. One of the overlooked aspects of obstacle emplacement is that there must be security of the obstacles during their construction. Units are highly susceptible to enemy attack while they are emplacing obstacles. Thus, forces must be designated to pull security during this construction. Because of this you must have sufficient forces to pull this security. If you do not have the necessary forces to pull security; this is a factor in determining the number of obstacles you can emplace.
4. Materials Available. You must calculate what you physically have on hand in terms of the materials needed to emplace obstacles. This includes things such as mines, pickets, wire etc… Some of these items may be already forward, while others may be located in the rear area and need to be transported. It is a good idea to develop a table which shows all your materials and then different columns highlighting when they will arrive for emplacement. For example, under pickets you show what is forward now, what can be here in 4 hours, 6 hours, etc …
When determining materials available, also determine the different resources you have available to emplace minefields. As we discussed in our last article, mines can be emplaced by artillery, air assets, etc…. You must know what is allocated to you with these special munitions.
5. Transportation Available. You can have all the materials you desire in the rear area. However, if you do not possess the necessary transportation to get it where you need it – it is useless. You must know what you have available and what each can handle in terms of payload. Many units will have some transport vehicles preloaded with different obstacle emplacement packages. In our experience, the biggest stopper in obstacle emplacement is transportation. Not only not having enough, but not getting your ‘stuff’ to the right place. It can be a frustrating experience.
6. Time Available. The final resource and probably the most important is time. You must know how many hours/minutes you have to utilize. In the final analysis, time will drive the train. In analyzing your time, you must look at the conditions. An hour of work at night is different than an hour in daylight. An hour in cooler temperatures is different than the extreme heat of the day. Always remember time is not created equally.
With your resources determined; decisions must be made.
Step 6 – Finalize Work Plan (Should it Stay or Should it Go)
With apologies to The Clash (sort of), this step is the difficult one. It is here where decisions are made. After determining your resources and then matching it to your priorities; you are likely to let out a heavy groan. The odds are highly likely (perhaps, inevitable) your wants will exceed your abilities (isn’t this true in many areas!). After clearing your throat, it is time to get down to some serious business.
In finalizing your work plan, the key factor is time available. Using your priority list, draw a line at the point where you can realistically emplace obstacles within your estimated preparation time. This prep time may increase or decrease based on the situation on the ground. If your prep time increases, you can now work your way down the priority list. If it decreases, you will have to develop contingencies. If you questioned the utility of making an unconstrained obstacle list in step 3; you now see where it will provide great assistance and save you substantial time now.
Despite determining your work plan, your task is not complete. There are still two critical steps that must be accomplished before you can begin to see the fruits of your labor.
Step 7 – Determine Task Organization
Now that you know what is feasible; you must decide the optimal way to get it done. Earlier in this process, you determined the aggregate resources you have available to emplace obstacles. It is now time to take these resources and organize them in the most effective manner.
The difficult decision in determining task organization is how to break up your engineer assets. There are several considerations in breaking up your engineers. These include who is your main effort, priorities of work, habitual relationships etc ….
There are a couple of goals in task organizing your assets in obstacle emplacement. First, is to ensure every unit receives the assets they need to construct the obstacles they were assigned. Second, is to provide units the needed assets to execute their own obstacle plan. Third, if possible attach engineer units to maneuver units they have familiarity in working with. The more habitual relationships you can maintain—the better. Finally, ensure every small unit is under the command and control of a larger maneuver unit. A good rule to follow is that every Soldier works for a Captain.
Step 8 – Determine Coordination/Transportation
You have crafted a masterful obstacle plan that almost assuredly will assist you in accomplishing your mission. Yet, if you do not get the right people to the right place at the right time it will be for naught. You must determine the coordination and transportation required to turn the plan into reality. We can not tell you how many times we have seen units not follow through to make things happen.
Here are some examples that fortunately happened in a training environment. First, a group of engineer vehicles sits idly at a coordination point for hours waiting for an escort to take them forward. The escort did not know the requirement. Second, a group of hard charging Soldiers unloads balky rolls of concertina wire on a hot, humid day. The Soldiers would find out later that the location had changed earlier in the day. They were never told. Finally, a convoy of vehicles containing critical barrier material remains parked in the rear support area. A unit preparing their defense is waiting on them, but the convoy commander does not receive his orders until precious hours later,
These were frustrating events that could have been prevented with some detailed coordination planning. This planning needs to be tracked by watchful eyes when it is being executed on the ground.
REVIEW
The task of developing an obstacle plan is a challenging task. It is part science, part art and a takes a great deal of thought and insight. It all begins with understanding yourself, the enemy, and the terrain. This analysis sets the conditions for the rest of your planning. From that point, you determine your necessary requirements, your resources available to emplace those requirements, and then you task organize and conduct the vital coordination to make it all happen on the ground. We hope this article has portrayed the amount of work you must conduct to develop a quality obstacle plan. Just think, all this work and we have not even physically emplaced one mine or laid out one roll of wire!
NEXT MONTH
We will conclude our discussion on the defense by sharing some things we have learned over the years on utilizing all your resources in the defense. This includes segments on fire support, smoke, and logistics among others. It is the good commander who gets all his assets into the fight. It is the winning commander who can then get the most out of each asset and can complement the strengths of each.