
Anatomy of a Game System
Â
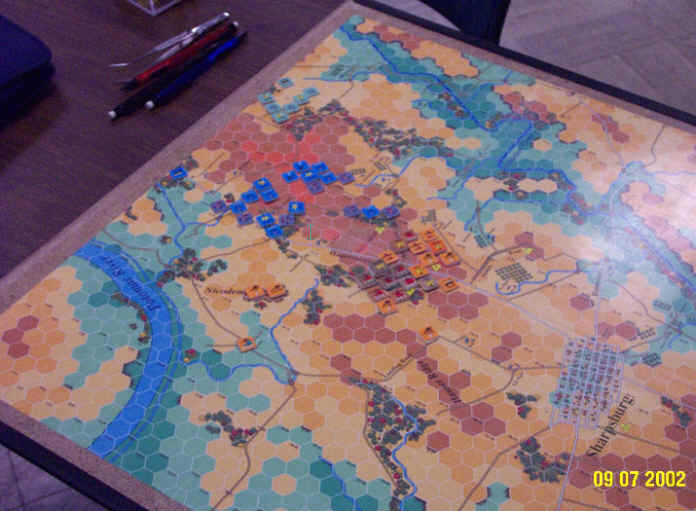
Above is the opening stage of the Cornfield scenario of In Their Quiet Fields 2. Hooker’s I Corps (royal blue counters) and the XII Corps under Mansfield (green-blue counters) are poised to assault Stonewall Jackson’s troops (gray and butternut, of course) at the North end of the battlefield. Every game in the series has multiple scenarios. Even the bigger games have smaller scenarios that can be played in a couple of hours. This scenario above is one of those that fit into that category. Notice the date on the lower right (ten days from the 140th anniversary). Me and my friend Charlie Banks played the scenario as a study for our upcoming Round Table trip to Antietam National Military Park. Two weeks later we were at the Park and were amazed at how closely the map represented the Cornfield (by the time we got to the Park, though, the corn had been harvested.) This scenario is very tension filled.
{default}Â

Above is a copy of an Orders Log. This form is not available with the game, but can be easily made with any spreadsheet and printer. It is simply a memory aid to keep in mind the status of an order, and what order was written to what command. When one gets to the point when the order has been received, the notes on the top line serve to help in remembering the quantifiable elements involved with determining the column to be used when rolling for acceptance. The box on the far right of the form is the acceptance status after that roll has been made. The results could be accepted immediately (good luck), D1 (a delay reduction roll in future turns of a 1 or 2 is needed; 1/3 of a chance), D2 (a 1 is needed on delay reduction rolls in future turns) and Dt (orders are distorted, forget about it, write new orders next turn). The bottom part is the order itself. The order I wrote was for my Confederate troops to defend the right flank at Stones River in No Better Place to Die.
Â

Â
Note the page above. It is a copy of the fire charts from the brigade level games. The chart at the upper left is used to determine small arms fire points. The chart at the upper right is for fire point determination for artillery. The points of any given fire combat are a combination of the unit’s fire current fire strength and range to the target. Note that small arms have a range to two hexes (400 yds.) and artillery has a range of ten hexes with negative modifiers for firing at most targets beyond a range of three hexes. The middle chart is the Fire Combat Table. To the left are column modifiers. To the right are explanations of the results and a Leader Loss Check table. If a fired upon hex sustains hard losses as determined by this chart, then and only then, is a leader in that hex susceptible to becoming a casualty. A look at the bottom two rows of the chart indicate that all units that roll an eleven or twelve for their fire inflict really deadly on their targets – the downside being that the the firing units are now in a low ammo status. The bottom two charts are for stragger determination. The left straggler chart is for casualties inflicted at 1/2 to 1; the right chart is for fires that inflict 2 or more casualties.
Â
Â
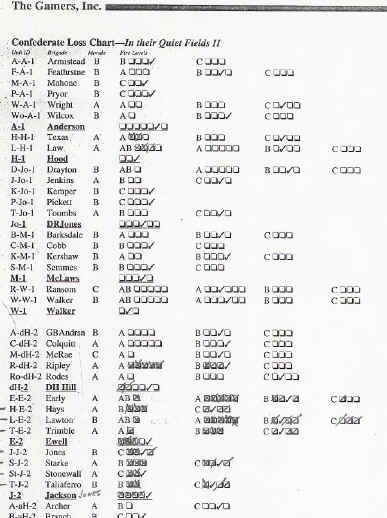
This is a portion of the Confederate Loss charts from the 2nd edition of In Their Quiet Fields (Antietam). The scenario played was the Cornfield scenario. The portion of the loss charts are, of course units belonging to Stonewall Jackson. Each line represents one brigade. Each box in each line represents one hundred men of the brigade. Each brigade is grouped with others in its parent division. As fire combat occurs, losses in hard casualties and stragglers are recorded by the owning player (It is wise to keep one’s losses hidden from one’s opponent). In the body of the article, I’d mentioned a unit’s state of wreckage. You will note that each brigade has a checkmark at a given point in its line. As the unit accumulates casualties (both hard casualties and stragglers) boxes are filled in. A box filled in with a full "x" indicates a hard (irreplaceable) casualty. A box filled in with a single slash "/" indicates a straggler. At the moment that the last box before the checkmark is filled in with either the "x" or "/" the unit becomes wrecked.
Â