Tactics 101 102 – Mechanized Infantry Platoon: Tactical Maneuver of the Mounted Element
THE MECHANIZED INFANTRY PLATOON
TACTICAL MANEUVER OF THE MOUNTED ELEMENT
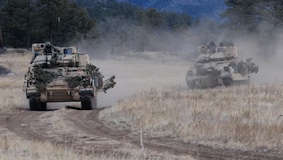 “Sun Tzu said: In war, the general receives his commands from his sovereign. Having collected an army and concentrated his forces, he must blend and harmonize the different elements thereof pitching his camp. After that, comes the tactical maneuvering, than which there is nothing more difficult. The difficulty of tactical maneuvering consist in turning the devious into the direct, and misfortune into gain.â€
LAST MONTH
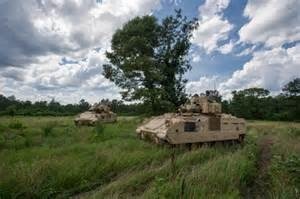
In our last article, we began our discussion on Mechanized Infantry. We keyed on the following areas: 1) Providing a very concise history of Mechanized Infantry. 2) Addressing the Bradley Fighting Vehicle. 3) Detailing the organization of the platoon – mounted and dismounted elements. 4) Discussing the responsibilities of the key personnel in the platoon.
THIS MONTH
With the foundation laid last month, we will begin delving into fighting the platoon. To start our discussion, we will focus on maneuvering the mounted element of the platoon (the Bradleys). We will address three areas. First, we will detail the formations the platoon may utilize in maneuver. Second, we will look at the maneuver techniques the platoon as at its’ disposal. Finally, we will highlight some of the challenges a mechanized platoon may face during maneuver. Let’s Mount up!
Maneuver – Formations and Techniques
Before we get into the specific formations and techniques utilized by the platoon; we need to clarify some things. Since the platoon is part of a company it is obviously heavily influenced by the formation and techniques utilized by the company. Consequently, the platoon leader may be ordered by the company commander to utilize a specific formation or technique within the company. However, many times the platoon leader will select his own. This is particularly true in regards to formations. Thus, if the company is in a wedge, the platoon may be in a different formation within the wedge. The platoon leader should always let his commander and his fellow platoon leaders know what formation they will utilize. Maneuver techniques also must be coordinated throughout. Normally, the technique used by the company has each of the platoons playing a direct part in its execution. Consequently, there is not a lot of freedom for the platoon leader.
FORMATIONS – In our mini-series on Light Infantry, we addressed the criticality in selecting the right maneuver formation at the right time and the right place. This criticality is no different within Mechanized Infantry. For the Mech Platoon Leader, he must take several things into consideration when selected a maneuver formation. First, and obviously foremost, is its capacity to aid in accomplishing the purpose and task of the platoon. Second, is its ability to aid in securing the platoon. Third, based on the tactical situation, is the formation’s capability to enable freedom of maneuver. Finally, based on the tactical situation, is the formation’s ability to assist the platoon leader in command and control. Utilizing these considerations, the Platoon Leader has several formations he may utilize. These are the column, line, wedge, echelon, coil, and herringbone. We’ll address each below.
Column – This formation certainly has great utility for the platoon leader. If he wants to get from A to B as quickly as possible and does not expect enemy contact; then the column is the clear formation. If the platoon is maneuvering through very restricted terrain (jungle, woods, trail in the hills or mountains, etc…); then the column is the likely formation. When you think of the column, you immediately visualize Bradleys following right behind one another. There is however, a variant which we call the staggered column. In the staggered column, as the name implies, vehicles will maneuver behind each other, but positioned to the left or right (see diagram below). In general, the column:
- Is a very easy formation for the platoon leader to command and control.
- Has good fires from the flanks.
- Fires from the front and rear of the column are weak.
- In the standard column, security is weak. Security is improved somewhat with the staggered column.
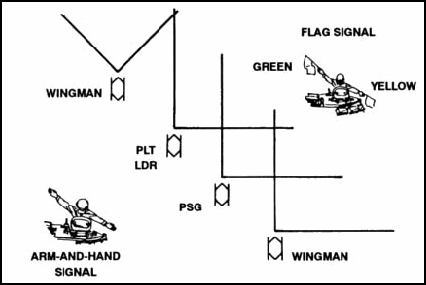
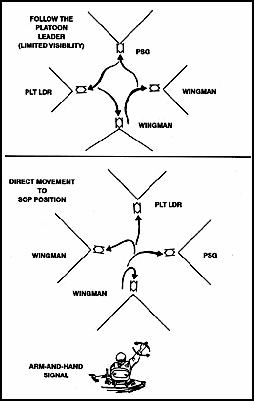
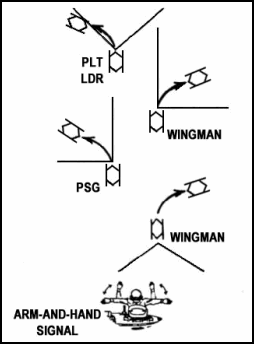
Below you will find a diagram of the staggered column. Within the diagrams of the formations, you will find: 1) Positioning of each of the platoon’s vehicles in the formation. 2) The scanning responsibilities and fields of fire for each vehicle. 3) The arm and hand signals for the formation if the platoon leader determines to change formations to the column. 4) The flag signals for the formation if the platoon leader determines to change formations to the column.
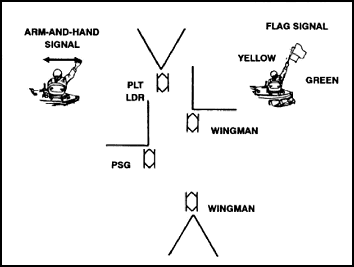 Column formation with dispersal for added security (staggered column).
In any formation, one of the challenges is tying in vehicle dispersion with formation integrity. Within the column it is a bit easier than the others to meet this challenge. The basic fundamental is keeping the vehicle ahead of you always in eyesight. Of course, with technology today you can track via computer screen, but eyesight is a good rule of thumb. Obviously, many factors can impact on this. These include weather, time of day, terrain, dust signatures, etc….
Line – There are many uses for the line formation for the platoon leader.  These include assaulting an objective (specifically if it is defended by an inferior force) or quickly occupying terrain where you will conduct a support-by-fire task. The line formation affords the platoon leader the ability to maneuver to terrain rapidly and with impressive firepower to the front. In general, the line formation:
- Is a challenging formation for the platoon leader to command and control. Much of this has to do with the tactical situation in which you would normally utilize it. The line is associated with and speed and direct fire. These make command and control difficult.
- Produces outstanding firepower to the front and rear, but possesses poor firepower to its flanks.
- Is not as secure a formation as others in platoon leader’s kitbag. This is because of the obvious lack of depth within the formation.
Below is a diagram of the line including signals. In terms of dispersion, you want some dispersion between the vehicles on line. One of the main reasons is that you do not want an enemy gunner to be able to see two or more vehicles in his scope at once. If this occurs, it makes it far easier for a gunner to fire at one vehicle and then immediately shift to another. While in the line, all other vehicles gage off the platoon leader’s vehicle
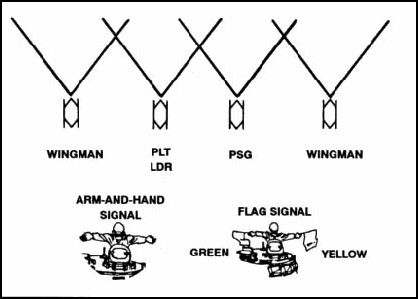
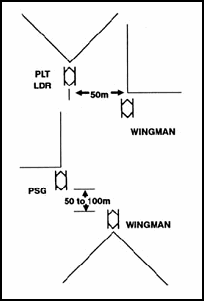
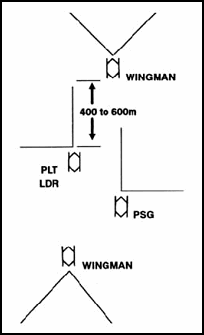
Wedge – One of most reliable formations a platoon leader has at his disposal is the wedge. He will normally utilize this when he is unsure of the enemy situation and anticipates that there may be enemy contact during his maneuver. Within the wedge, you will find the platoon leader and platoon sergeant vehicles in the lead. The wedge:
- Is a formation which facilitates good command and control.
- Has outstanding fires to the front and good fires to the flanks.
- Has good all round security.
In terms of dispersion, everything will key off the platoon leader’s vehicle. First, the platoon leader’s wingman will echelon to the left of vehicle approximately 75-100 meters. Second, the platoon sergeant’s vehicle maneuvers on line with the platoon leader (using the platoon leader as the guide). Again, the distance between the vehicles is 75-100 meters. Third, the platoon sergeant’s wingman is echeloned to the right of his vehicle approximately 75-100 meters. Within the wedge, the two wingman should be positioned across from one another. There will be times, because of the terrain where the wingman will maneuver directly behind the platoon leader/sergeant respectively and then echelon out when the terrain permits.
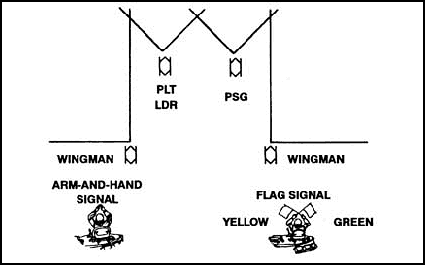
Echelon – The echelon formation is normally used as part of a larger company formation. This occurs when the company commander wants more eyes to one of his flanks or is concerned about security to a particular flank. Consequently, he will designate a platoon to maneuver in an echelon formation. For example, if the commander requires more observation on the right flank; he will assign a platoon to maneuver in an echelon right formation on the right flank of the company formation. Conversely, if the commander is concerned about security on his left flank; he will assign a platoon to maneuver in an echelon left formation on the left flank of the company formation. The echelon:
- Is a very challenging formation to command and control. Because of the echelonment, it is difficult to keep good dispersion (about 100 meters) and keep the formation intact. This is why the platoon leader, who normally leads formations, positions himself in the middle of the formation to aid in command and control.
- Possesses outstanding fires to the front and the echeloned flank.
- Possesses good security to the front and the echeloned flank.
Coil – The coil is one of the principle formations a platoon leader may utilize when the platoon is stationary. It is generally selected when the probability of enemy attack (in any form) is unlikely. Because of this, the coil is an excellent formation:
- When the platoon is conducting refueling operations. This is when the fueler is coming to the platoon location.
- When the platoon is getting resupplied. Resupply could include ammo, water, food, barrier material, etc….
- When the platoon leader wants to give instructions or orders to his platoon.
- When the platoon is conducting maintenance of the vehicles.
- When the platoon simply needs some rest.
The coil is fairly simple to execute. The platoon leader (or lead vehicle in the formation) will halt and position themselves at the 12 o’clock. The other vehicles will then take up positions at the 3, 6, and 9 o’clock positions. Their positions in the coil can vary. In some units it may be Standardized Operating Procedure (SOP) that a vehicle will always occupy the same clock position in the coil. Other times, the maneuver formation the platoon is currently in may determine the coil position. This is obviously a little easier in some formations than others. In terms of dispersion, you want at least 100 meters between vehicles. Of course, terrain will have a big impact on this.
As with everything, security is paramount. Even though the likelihood of enemy attack is minimal, you must be prepared. Thus, the platoon should undertake the following actions:
- Emplace air guards in the Bradley turrets to observe any enemy air attacks. The number will obviously depend on the air threat. If you have air superiority, then one vehicle is sufficient.
- Within the platoon, there should also be some number of Bradley gunners scanning to their front. Again, the number will depend on the potential threat. Usually if you are in a coil, the threat should be minimal.
- It is also advised to conduct some dismounted patrols outside of the coil. It is amazing how many times a dismounted patrol comes across an enemy observation post or long distance dismounted reconnaissance personnel.
Herringbone – The second stationary formation the platoon leader has available is the herringbone. The herringbone is normally utilized when the platoon is maneuvering in column formation on a road or trail and must halt. The halt could be associated by an anticipated enemy air attack or the need to make a quick stop. The quick stop may result if friendly forces forward of the platoon have stopped resulting in the platoon needing to halt.
The herringbone should be a relatively easy formation for the platoon to get into. Each vehicle simply peels off the trail or road and tries to find some cover and concealment from enemy air. It also can be utilized in open terrain. In this case, you are not looking for cover and concealment, but dispersion. Once the vehicles are set in position, the dismounted infantry will dismount and establish security for the Bradleys.
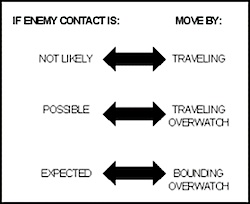 Enemy Contact and Maneuver Techniques
Maneuver Techniques – As we addressed in our discussion on light infantry maneuver, there are two elements to maneuver – the formation and the technique. Having addressed maneuver formations; let’s shift now to the maneuver techniques a platoon leader may select. As with light infantry, these are traveling, traveling overwatch, and bounding overwatch. Again, the overriding factors in their selection is the likelihood of enemy contact and the speed in which the platoon leader wants to maneuver his platoon. Also as a review, as those conditions change; so too can the maneuver technique. Thus, the platoon may transition from traveling to traveling overwatch to bounding overwatch as the tactical situation changes. Below is a graphic highlighting these possible changes.
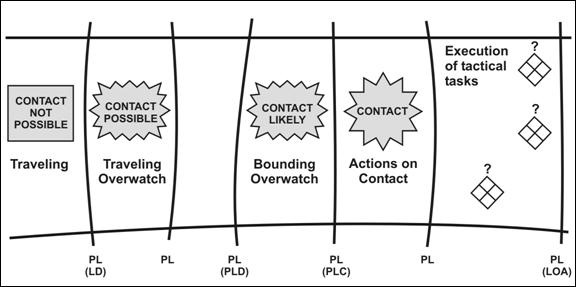 The Maneuver Technique Continuum
Let’s discuss the three techniques available for the platoon leader:
Traveling – When the chance of enemy attack is very unlikely and you want to maneuver from A to B as quickly as possible; you will utilize the traveling technique. Within traveling, the unit as a whole maneuvers simultaneously. To aid in this, you will combine this with the modified column formation.  When comparing traveling to the other techniques, several characteristics step out. First, and most obvious, is that it generates the most speed. It allows for more control for a commander than traveling overwatch, but not as much as bounding overwatch. Finally, it has the least security and the least dispersion among vehicles than the other two techniques. Again, you are sacrificing security for speed in the traveling technique.  Below is a diagram of the platoon in the traveling maneuver technique with the modified column maneuver formation.
Traveling Overwatch — When enemy contact is possible and speed is still important, a commander will likely utilize traveling overwatch. Within traveling overwatch, the platoon leader will send out forward one Bradley (or a section) ahead of the rest of the platoon when the situation dictates. That Bradley will provide early warning and security for the platoon. The purpose of the other Bradleys is to provide overwatch for this lead vehicle or section. If the tactical situation does not require this, the platoon will simply maneuver in traveling.
METT-TC dictates how far ahead that vehicle or section will be in front of the main body. It is a balance between being far enough apart to provide early warning and security and still being close enough to be in direct fire range of the main body if support is needed.
When you compare traveling overwatch to the other techniques; it is about in the middle in terms of speed and security. It is faster than bounding overwatch, but not as fast as traveling. In regards to security; it provides more security than traveling, but not as much as bounding overwatch. In relation to all the maneuver techniques; it is the most challenging to command and control.
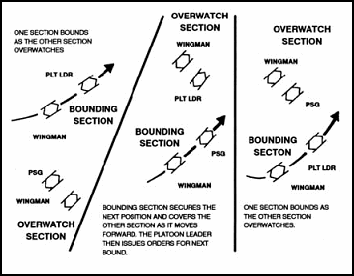
Bounding Overwatch — The final technique available to the platoon leader is bounding overwatch. It is utilized when the platoon leader believes contact is expected. Within bounding overwatch, there are two varieties – alternate and successive bounds (we will address each momentarily). As the name implies, in bounding overwatch there will be elements conducting maneuver and those who will support the maneuver in support by fire positions.
The concept is pretty basic. There is essentially an element maneuvering while another element positions itself in terrain that can support the maneuver. This support would be to utilize fires (direct and indirect) on enemy forces that could impact the maneuver element. Once the original maneuver element finds suitable terrain it will halt and then support the maneuver of the original overwatch element. This process continues as the tactical situation dictates.
As highlighted above, the critical variable in bounding overwatch is terrain. You need terrain that assists the maneuver element and terrain which benefits the units providing overwatch. Obviously, the overwatch elements needs terrain that provides several things. First, it must be in a location to truly support by fire the maneuver by the maneuver element. In other words, it must provide good observation and fields of fire. Second, it must be where it will be difficult for the enemy to observe them and consequently, not be able to place direct fires on them. In other words, it should provide good cover and concealment. Selecting this terrain on the go is a challenge. What may look like good terrain from a map or even an aerial view might not be the same on the ground. Also remember that during a mission terrain changes too. Things like vehicle movement, weather, indirect fire, etc… can certainly change the landscape.
Before we illustrate how a platoon would execute the above techniques, we need to address the two key components in any type of overwatch – the base of fire section and the bounding section. They clearly go hand and hand and set the conditions for maneuver when enemy contact is likely.
Base of Fire Section
At first glance, this may appear to be a fairly straightforward assignment. After all, how tough is it to throw some lead downrange. However, there is far more to this in order for the base of fire unit to be successful. First of all, you must quickly find terrain that is conducive to achieve your task. Obviously, time is critical here. Every minute you spend determining positions is time that can detrimental in enabling the bounding element to maneuver to the location they need to go to. As we addressed earlier, the terrain should provide the ability to place fires where they are needed to support maneuver. It also should provide the base of fire section with cover, concealment, and security.
The base of fire section must understand several key direct fire principles. First, they must understand what their role is. Sometimes it may be to simply suppress enemy forces. Other times, it may be more focused on the destruction of enemy forces. Second, the base of fire section must define sectors of fire for its’ weapons. It is not effective to have every weapon fire in one particular area, when a wider area is needed. Third, this isn’t a “wild minute†of unconscious firing. There should be a purpose on where rounds are going and Bradley Commanders should be aware of ammunition conservation. Put these altogether and the base of fire section will be instrumental in the success of the bounding section.
Bounding Section
There are few situations more unnerving than being part of a bounding section knowing that enemy contact is highly likely. It is the combination of this likely engagement and maneuvering in unfamiliar terrain which ratchets things up. With that said, there are things that the bounding section can do which will aid them tremendously. These include:
- Taking advantage of terrain. Leaders must understand where the terrain affords them cover and concealment. Driving your Bradley on a ridgeline is not taking advantage of terrain.
- One of the key questions that must be answered is: How long is the bound? Again, you must consider METT-TC. One of the prime considerations is not maneuvering past the range where the base of fire unit can support you. A good rule of thumb is no farther than 2/3 of the effective range of the majority of the base of fire weapon systems. For the Bradley, the prime consideration should be the Bushmaster Main Gun. So if that is say, 2000 meters; then 1333 meters is about the limit. Of course, terrain will predicate if that is feasible.
- If the terrain is very restricted, the length of the bounds will be much shorter.
- If terrain is open, bounds will likely be farther. There must also be more dispersion between the two Bradleys conducting the bound.
- During bounding, each Bradley should be able to see each other. This allows leaders to control maneuver by hand and arm signals. Radios should be your second option based on operational security.
- Bounding at night is obviously optimal for security. However, night maneuver does present many challenges as we have discussed in prior articles.
- Bounding in conjunction with indirect fires can be highly effective.
Earlier, we talked about the two types of bounding overwatch – Alternate and Successive Bounds. Let’s get into more detail below:
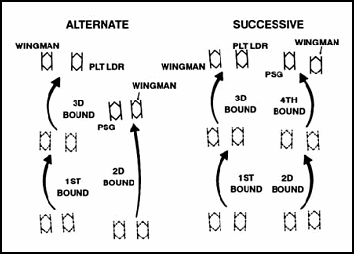 Methods of bounding overwatch.
Alternate Bounds – Bounding Overwatch
In alternate bounds, sections essentially play leap frog (not a tactical term!) with each other. Let’s explain: As the platoon begins maneuver, one section will maneuver forward while the other section provides overwatch in a stationary position. The maneuver section will find terrain forward where it can occupy a support by fire position. Once the section is set, the original overwatch section will begin maneuver and maneuver (bound) past the section now providing overwatch. This section will then find terrain to provide overwatch, set, and then enable the trailing section to bound past them. The platoon continues this sequence – Bound/Set/Bound as the tactical situation dictates.
Successive Bounds – Bounding Overwatch
The big difference in successive bounds is that the sections do not leap frog past one another. Instead they pull up abreast of each other. Once they are both stationary, the section that was initially stationary will then maneuver forward and then occupy a support by fire position. This back and forth normally continues until enemy contact (remember you utilize this technique when enemy contact is likely) or if you switch to another maneuver technique.
CHALLENGES TO MAENUVER – Whether mounted or dismounted, there will always be challenges for units in regards to maneuver. It is always good when you can anticipate these challenges beforehand. However, as we all know that is not always possible. One of the biggest challenges a Bradley platoon will face is crossing a danger area. For our discussion we will define a danger area as locations you will come across on your maneuver which can subject the platoon to observation, direct fire, or indirect fire. These could include locations such as a large open area, bridges, or roads and trails which may be suited for ambush
When you come across a danger area you would like to ultimately avoid it. Of course, that is easier said than done. Many times, there is no other alternative than to maneuver through it. When you do maneuver, it must be quickly executed, and with security at a premium.
Let’s look at a couple of techniques on how a platoon may cross a large open area it may encounter during maneuver.
When approaching an open area, the first question the platoon leader has is should I dismount my Infantry to clear the open area? It is a decision that must be thought out wisely. For the purposes of our discussion here, we will determine that the Platoon Leader has decided to cross the open area without dismounting his Infantry. With this decision made, let’s look at how the platoon could cross the danger area utilizing each of the maneuver techniques.
Traveling – Although this is not the optimal solution, the platoon could maneuver in a traveling formation through the open area. In this case, we are banking on speed and foregoing much security. In this technique, we are highly susceptible to an enemy ambush which could destroy the entire platoon very quickly.
Traveling Overwatch – Another maneuver technique a platoon leader may select is to conduct traveling overwatch through the open area. In this technique, the platoon leader will send a section forward to maneuver through the open area. It has a challenging mission to maneuver through the open area to ensure the rest of the platoon (and potentially follow-on forces) can safely maneuver through the area. To achieve this, the section will try to find a good route along the outskirts of the open area. If this isn’t feasible, they may have to bound themselves with the two Bradleys.
Following the section is other section of Bradleys. As we addressed earlier, the overwatch unit has a challenging mission. In this scenario, it must maneuver at variable speeds to keep in contact with the forward section. There is a fine line in the distance the overwatch element trails behind the traveling element. It must be at least close enough so that it can use suppressive direct fires if the traveling element needs it. However, it must trail far enough behind so that if the forward element gets engaged; they themselves do not get decisively engaged. Of course, terrain will have much to say on this distance.
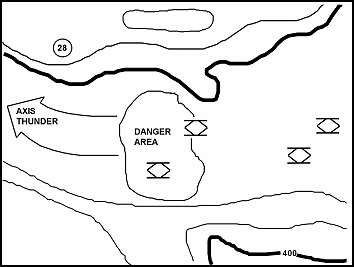 Crossing a Large Open Area Utilizing Traveling Overwatch
Bounding Overwatch – The last technique available to the platoon leader is bounding overwatch. This will take the platoon the most time to cross the open area, but if you are confident that enemy contact is eminent then it is the most prudent. The platoon leader can utilize either of the two methods of bounding overwatch – successive or alternate bounds. This will be a quick judgment call based on the terrain. It is not unusual for the unit to begin in one method and then switch to the other based on METT-TC. The keys in making this successful are excellent communication, utilizing the terrain to maneuver wisely, and utilizing the terrain to occupy good overwatch positions.
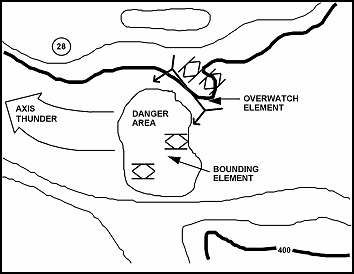 Crossing A Large Open Areas Utilizing Bounding Overwatch
REVIEW – In this article, we focused on the maneuver of the Bradley Platoon. We addressed in detail the two key components of maneuver – the formation and technique. The Platoon Leader has much flexibility in determining formation and technique. Obviously, he will take all aspects of METT-TC in consideration in selecting each and changing formation and technique during the execution of a mission. We concluded our discussion by illustrating how a Platoon Leader may cross an open area by utilizing each of the three maneuver techniques.
NEXT MONTH – Our next couple of articles will continue our discussion of the Bradley Platoon. In these articles, we will dissect how the platoon executes operations in the offense and the defense. This you on the high ground!


