


CDG 32 Marines at Tarawa
Web Extra! Until recently, ACG readers had to wait two issues to find out the solution to our popular You Command Combat Decision Games. Now we are posting the historical outcome and analysis at ArmchairGeneral.com shortly after the respective due date for submissions of Reader Solutions. Here is the outcome for You Command CDG #32, “Marines at Tarawa, 1943,” May 2009 issue.
Marines at Tarawa, 1943
The May 2009 issue of Armchair General® presented the Combat Decision Game “Marines at Tarawa, 1943.” This CDG placed readers in the role of Major Michael P. Ryan, commander of L Company, 2d Marine Regiment. Ryan’s mission was to attack and overrun the islet of Betio, site of the main Japanese defenses of the Tarawa atoll in the Gilbert Islands. The capture of Tarawa could lead to control of the Gilbert Islands – the first vital “stepping stone” for Admiral Chester W. Nimitz’s drive across the Central Pacific region, and the first stop on the long road to Tokyo.
On November 20, 1943, L Company, which was part of the first wave from an overall force of 35,000 Marines committed to the operation, hit the beach on Betio. The assault quickly turned into a bloody shambles. An exceptionally low tide grounded the landing craft hundreds of yards from the beach, exposing the Marines to devastating enemy fire as they waded ashore. Although the LVTs (Landing Vehicles, Tracked) weren’t affected by the shallow water, a number of them were destroyed by heavy Japanese fire. By November 21 – D+1 – the first waves of Marines were pinned down. Many, like Ryan’s unit, were stuck in isolated pockets near the shoreline. Meanwhile follow-on waves circled offshore waiting for a place to land. The Japanese defenses were formidable, resistance was unexpectedly fierce, and success depended on the courage and perseverance of the individual Marine units facing heavy odds on the invasion beaches.
HISTORICAL OUTCOME
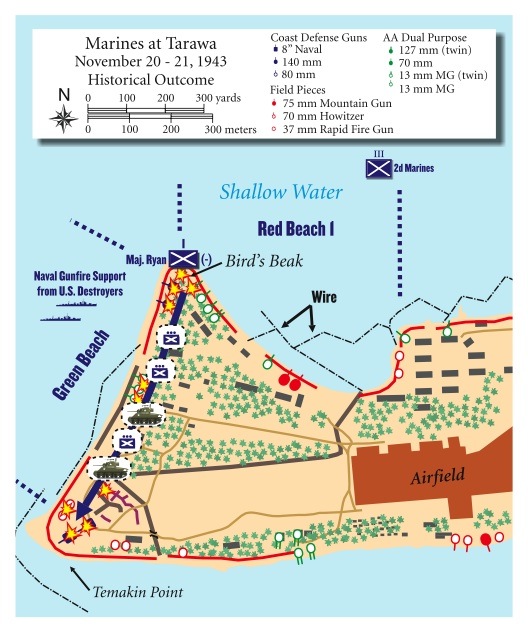 On D+1 only about 60 percent of the men of L Company remained under Major Ryan’s command; the rest either were casualties or had become separated from the company during the initial assault. However, Marines from at least four other units had joined the command, forming a “composite” company. Counting the crewmen from beached LVTs, and a few signalers, corpsmen and engineers, Ryan controlled about 90 Marines, plus two M-4 Sherman tanks.
Ryan and his composite force were stuck on a tiny sand spit at the western tip of Red Beach 1 in an area called the Bird’s Beak. Cut off from contact with the other Marine units strung along the invasion beaches, he decided that his command’s best course of action was to attack south to try to clear the Japanese defenses along Green Beach (CDG Course of Action Two). Although this move would not help his men link up with the other Marines on Red Beach, if successful it would allow U.S. reinforcements to land on Green Beach. These follow-on troops were vital to the Marines’ effort to build up enough combat power to overwhelm the Japanese defenders.
At 11:20 a.m. on November 21 Ryan launched his Marines southward, with the two tanks leading the way. Just before the attack kicked off, a U.S. Navy shore fire control party – the link to naval gunfire support – joined Ryan’s command. The fire control party called in naval gunfire targeting the Japanese bunkers on Green Beach, and then Ryan’s tank-infantry teams, accompanied by engineers with satchel charges, assaulted the enemy positions and destroyed them one by one. The Japanese occupants either were killed outright or were sealed inside their bunkers – now their tombs – by the explosive charges.
Although heavy enemy fire often forced Ryan’s men to go to ground, the U.S. destroyers and the tanks provided the command with the combat power it needed to overcome the Japanese defenses and keep moving forward. Within an hour Ryan’s Marines had cleared Green Beach to a depth of about 100 yards and had reached the beach’s southern terminus at Temakin Point.
With Green Beach now accessible, the Marines of the 1st Battalion, 6th Regiment began coming ashore in their landing craft. Ryan radioed his commander, Colonel David M. Shoup, who was on Red Beach 3, and requested permission to continue his assault along Betio’s southern shoreline. Shoup, however, denied the request and ordered Ryan to deploy his command along Green Beach to protect the 1st Battalion against a possible Japanese counterattack. By sundown the reinforcements had completed their landings.
Ryan’s actions, and those of the other U.S. units on the invasion beaches, had turned the tide of battle in the Marines’ favor. Yet it took two more days – and one long bloody night during which 600 Japanese launched a desperate “banzai” charge – to finally defeat the enemy on Betio. The cost in blood was high: 990 Marines and 687 Sailors were killed, while 2,296 Americans were wounded. Nearly all of the more than 4,000 Japanese defenders died. The Marines captured only 17 Japanese soldiers and 129 Korean forced laborers.
As bloody as the battle on Tarawa was, it validated a completely new concept of operations – the amphibious assault into the heart of a defended beach. Taking the hard-won lessons of Tarawa and improving upon them, Marine, Army, and Navy forces went on to conduct similar assaults on other Pacific islands and atolls, destroying Japan’s Pacific empire.
READER SOLUTIONS
ACG judges based their selections for winning Reader Solutions and those receiving honorable mention on submissions that chose Course of Action Two: Attack South, or those whose explanations demonstrated a solid understanding of the key points for an amphibious assault. (See After Action Report.) COA Two got Ryan’s command off the isolated Bird’s Beak and moving forward, engaged the Japanese in the sector and prevented them from concentrating elsewhere against other Marine units, and contributed Ryan’s combat power to the overall invasion effort. All assault units, even those that were cut off, had to “get into the fight” quickly to maintain the landing force’s momentum. Since only a handful of tanks made it ashore during the first few days, it was imperative that the two in Ryan’s command be committed as soon as possible, as they were vital weapons that could cross the fire-swept zones and destroy the Japanese bunkers. Most important, by attacking south and clearing the Japanese defenses on Green Beach, Ryan’s composite company opened the beach for the landing of critical follow-on combat and support units.
Although Course of Action One: Attack East had the advantage of possibly linking up Ryan’s isolated outfit with other Marine units on Red Beach, it also meant that the company would have to attack through some of Betio’s heaviest Japanese defenses. (See Historical Outcome map.) If Ryan’s men ran into stiff resistance along this route, they likely would not have reached friendly lines before dark – a situation that would have left them disorganized and potentially exposed to a devastating banzai charge that night. Moreover, by approaching the flank of another Marine unit that was engaged in the attack, Ryan’s command risked incurring – and causing – “friendly fire” casualties, especially after dark.
Course of Action Three: Defend in Place was perhaps the worst possible plan, as it was simply an invitation to be thrown back into the sea. “Get off the beach” is the cardinal rule of amphibious assaults, and every effort must be made to keep the momentum of the attack moving inland.
AFTER ACTION REPORT
Key Points for an Amphibious Assault
- Develop the assault plan using all available information on enemy defenses, surrounding waters and tides, and the objective’s terrain.
- Ensure total cooperation and coordination of all allocated sea, air and land forces.
- Prior to and during the landing, maximize air and naval fires to reduce enemy defenses.
- Once ashore, quickly organize landing force for coordinated attack on enemy defenses.
- Establish artillery and mortar fire support ashore as soon as possible after landing.
- Rapidly reinforce the beachhead with follow-on combat and logistical support.
- Get off the beach! Keep the assault moving inland.
Upon reading this scenario in ACG I chose to attack the south beach also because securing a landing point for further reinforcements was paramount to taking the atoll and it would provide the best chance of linking up with stranded marines on Red Beach. Even better that there was a naval radioman with the group to direct the naval fire on the green beach bunkers held by the Japanese.
Major Ryan saved the day and I hope he was awarded the Congressional Medal of Honor for leading his men in this pivotal attack.
God Bless our Servicemen for all of their heroic sacrifices.
Major Ryan was awarded the Navy Cross for his service on Tarawa. There were more than a few Marines at Tarawa who felt he earned a MOH and that his actions allowed the battle to turn in the Marines favor.
If you are going to award him a medal award him a real one. There is no Congressional medal of Honor. The Medal of honor is what he should have been awarded there is no congressional to i. This is a very common mistake but a mistake non the less. Congress is only involved is the approval process.