
Tactics 101 035 – The Withdrawal
“Of all operations of war, a withdrawal under heavy enemy pressure is probably the most difficult and perilous. Indeed it is recorded of the great Moltke, that when he was being praised for his generalship in the Franco-Prussian War, and was told by an admirer that his reputation would rank with such great captains as Napoleon, Frederick, or Turenne, he answered, “No, for I have never conducted a retreat.” – Friedrich Wilhelm von Mellenthin

Last Month
In our last article, we provided you some things to think about when conducting a defense. We emphasized the wise commander utilizes all the resources he has at his disposal. He understands what he can achieve with each resource and just as important, what he can not. We highlighted it is critical for the commander to synchronize the effects of his resources at the right time and right place. When the commander has accomplished this, he has truly set the conditions for victory in the defense.
{default}This Month
One of the most challenging operations any unit can execute is the retrograde. Yet, despite its’ complexities, it receives minimal discussion and more importantly, little or no more training in the field or during staff exercises. Why does retrograde receive this apparent lack of respect? Several reasons come quickly to mind.
First, the sheer act of moving away from your foe instills negative feelings in many. After all, what unit filled with the warrior ethos would turn tail on their enemy? Second, the training of retrograde simply does not stir up the competitive juices of Soldiers and staff planners. Tell a unit they are going to train on withdrawal operations and you will likely get a bunch of blank stares. Finally, and most unfortunate, most commanders do not understand how vital a well-executed retrograde operation can be in the ultimate outcome of a campaign
Whatever the case, the commander who ignores training and discussion of retrograde operations is truly doing his unit and Soldiers a huge disservice! It is the wise commander who understands the old adage, “live to fight another day” is well grounded in history. It is the wise commander who knows reinforcing defeat is a senseless waste of Soldiers lives. Finally, it is the wise commander who realizes there are times on the battlefield when the conditions for success just do not exist.
With the wise commander in mind, we will focus on retrograde operations in our next two articles. This month, we will first provide you a review of retrograde. Then, we will focus on our first retrograde type – the withdrawal. Next month, we will discuss the other critical type of retrograde – the delay and retirement. So without DELAY – let’s begin.
Retrograde – A Quick Review
Retrograde operations are an organized movement (maneuver) to the rear, away from your opponent. There are numerous reasons for conducting a retrograde. These include:
*Disengage from combat operations because the conditions are not there for victory
*Gain valuable time without fighting a decisive engagement
*Force your enemy into culminating by lengthening his logistical tail or inflicting additional casualties
*Draw your enemy into an unfavorable situation so you may seize the initiative
*Preserve your forces or avoid combat because the situation no longer affords you the potential for success
*Based on the current situation; reposition forces to a more favorable position
* Position a portion of your forces elsewhere on the battlefield to assist in future operations
* Shorten your lines of communication (LOCs) to assist in logistical sustainment
* Based on the current situation (and to posture yourself for the future) position forces where it can safely conduct reconstitution (rearm/refit/retool)
* Adjust your defensive scheme to accomplish your purpose
* Deceive the enemy to set the conditions for future operations
As you see, the possible reasons to conduct a retrograde are numerous.
There are three forms of retrograde. They are delay, retirement, and withdrawal. As we delve into these forms the next few months, you will find that each share many similarities with one another. Depending on the environment, you could conceivably move from one form of retrograde to another.
The key consideration distinguishing the forms of retrograde is the specific intent or purpose. These purposes are:
- Delay — maintain contact with the enemy and trade space for time.
- Retirement — tactically move a unit not in contact with the enemy to a new location.
- Withdrawal — break contact and disengage a force from the enemy in order to free the force for other missions.
Since we will focus this article on withdrawal; let’s briefly discuss delay and retirement.
Delay – This is a form of retrograde where a unit under pressure trades space (terrain) for time. It does this by slowing the enemy’s momentum (physically and hopefully psychologically) and inflicting damage (casualties, destroying assets, etc.) on the enemy without becoming decisively engaged. The last part is the most challenging! It is extremely difficult to achieve the above without becoming decisively engaged. If this occurs the objective of the delay will not be achieved.
Retirement — This is a form of retrograde in which the unit is not in contact with the enemy and wants to move away to prepare for other operations. Obviously, this is the easiest (not that any of the forms is easy to execute) to conduct and involves the least risk. Normally, units executing a retirement will move away from the enemy in a tactical road march. As in any combat operation, a unit should be prepared to fight, but the chances of this are less likely than in a delay or withdrawal.
Withdrawal – Definition
Is a form of retrograde in which a unit is in contact, but not necessarily under pressure. In this operation, the unit disengages from the enemy and moves to an assembly area or a new defensive position. A unit may conduct a withdrawal unassisted or with assistance from other friendly forces. Within the withdrawal, there are two basic types – under enemy pressure and not under enemy pressure. We will discuss each in detail momentarily. First, we will highlight some basic principles that are critical to achieving success in either type.
Principles
When planning the withdrawal, there are several principles you must consider. These include:
- Obviously, the most important principle is to keep the enemy from putting extensive pressure on the withdrawing forces. Will you be able to deny the enemy from putting any pressure on the force – probably not. However, the combination of security forces delaying the enemy, well-placed obstacles, and accurate indirect fires can greatly assist in this effort.
- You must maintain all-around security. A withdrawing force is vulnerable from all directions. The withdrawing force will utilize internal security and may be afforded security from its’ higher headquarters during the withdrawal.
- Mobility is critical to achieving success in the withdrawal. You want to increase yours and decrease that of your foes.
- You can increase yours by:
- Spend the necessary time to plan and recon your routes.
- Utilize your engineer assets to improve the trafficability of your routes.
- Ensure you have developed a viable plan to command and control vehicle maneuver.
- Rehearse the maneuver. Utilize Standard Operating Procedures (SOPs) if you have them.
- Position air defense and NBC (Nuclear-Biological-Chemical) recon assets along your routes. Enemy air or a well-placed chemical attack can significantly affect mobility.
- Have a viable plan to ensure civilian refugees do not affect maneuver on designated routes.
- Evacuate your casualties and non-essential vehicles early.
- Position maintenance teams and equipment throughout your routes to assist in recovery and repair.
- You can decrease his by:
- Do not enable your enemy to seize key terrain that can assist him in maneuvering down high-speed avenues of approach.
- Target choke points (bridges, key intersections) for destruction when the time is needed. You must ensure you will not need these in future operations.
- Pre-plan obstacles (especially scatterable mines fired from artillery or air platforms) to emplace at critical times during the withdrawal.
- Utilize indirect fire to slow his maneuver.
- Utilize smoke to slow his maneuver.
- You can increase yours by:
- Move during limited visibility if at all possible. Certainly, this places challenges on your own command and control. However, limited visibility conceals your movement and reduces the ability of your enemy to utilize effective indirect fires on you. Limited visibility can mean moving at night or during the day utilizing smoke.
- Get your non essential forces out of the way ASAP. If they are not involved in assisting forces in the withdrawal, then move them to the rear first. Not doing this adds confusion (when no more is needed) and will clog up your withdrawal routes.
- Keep eyes on the enemy throughout. Do not maneuver to the rear blind. You must know the actions of your opponent. Keep Soldier eyes on him as late as possible. When that is no longer feasible – use technology.
- You must keep fires on the enemy throughout the withdrawal. Depending on the situation, this will be a combination of indirect and direct fires or just indirect fires. Your enemy must know he is susceptible to fires. If not, he will come after you in rapid order.
- Effective command and control is essential during the withdrawal. There must be a plan and it must be directed. Without it, chaos will surely ensue.
- Tied to the above, is the absolute need for the leaders to be seen throughout the withdrawal. As discussed earlier, the act of falling back can psychologically damage a unit. Leadership can soothe these doubts.
- The development and subsequent execution of a viable deception plan can be of tremendous assistance during a withdrawal. A deception story which is believed by the enemy can buy you precious time and minimizes your opponent’s interference in the actual withdrawal. Obviously, what you are trying to achieve in your deception is that you are not in the process of withdrawing your forces. There are many actions you can combine to assist in deception. These include:
- Conducting your withdrawal during limited visibility.
- Utilizing smoke to masquerade your maneuver. Of course, this must be well-thought out. Generating smoke right at the beginning of the withdrawal essentially tells your enemy something is going on.
- Withdraw vehicles in smaller groups if at all possible. This does not give off as big a signature to the enemy. Vice versa, if the entire unit picks up and moves out; this is a pretty good indicator to your foe that a withdrawal is taking place.
- Construct dummy minefields and fighting positions portraying that you are staying and not leaving.
- Try to keep things such as communications traffic as normal as possible. Increases in radio traffic generally indicate something is taking place.
- Actions such as feints and demonstrations can plant the seed in your enemy that offensive actions, not retrograde operations are imminent.
- In any retrograde operation, the main objective is to maneuver away from the enemy and not become decisively engaged. Consequently, the entire unit must understand the intent of the operation. It is very easy for smaller units to see potential enemy targets and begin offensive actions. This soon leads to that unit becoming decisively engaged and the need for other units to assist thing. It is the proverbial snowball effect!
Types of Withdrawals
When we discuss withdrawals we distinguish them in two categories. First, we determine the influence of the enemy during the actual conduct of the withdrawal. Certainly, as planning begins to conduct the withdrawal; you will be under some form of enemy pressure. However, during your mission analysis, you will decide the extent of enemy pressure during the execution. Thus, if you anticipate enemy pressure during the execution you will be conducting a withdrawal under enemy pressure. If you do not believe there will be enemy pressure then it is a withdrawal not under pressure. (Pretty complicated! — Hey that’s doctrine!)
The second distinguishing characteristic is the assistance the unit receives from outside the organization. Normally, this assistance comes in the form of the security force (discussed later). If a unit receives an outside security force; it is conducting an assisted withdrawal. If the security force comes from within; it is an unassisted withdrawal. (Once again, PHD level stuff!) However, in both cases, it is critical to know if it is under pressure or not under pressure; or assisted or unassisted.
Planning The Withdrawal
Organization
In any operation, it is critical you structure your force for success. This is no different in the execution of a withdrawal. In fact, the organization of your forces for the withdrawal is certainly one of the keys to accomplishing the mission. What makes it so difficult, is that you may have to conduct the organization in the heat of battle because the decision to withdraw can occur very quickly. Below we will detail the elements you will want to designate for the withdrawal.
Security Force – Without a doubt, the security force is the most important cog in the execution of the withdrawal. Within the withdrawal, the security force is the element that essentially maintains contact with the enemy enabling the rest of the force to withdraw to the rear. In an unassisted withdrawal, the security force is resourced from within. In an assisted withdrawal, the security force is provided by another unit.
The mission of security force is extremely challenging. First, they must provide the main body with the necessary time and forward protection they require to withdraw from their current positions to assembly areas to their rear. Second, depending on the situation, they may have to be ‘crafty’ enough to sell the enemy that they are the entire force and a withdrawal is not taking place. Finally, to cap it off, they must themselves be able to break contact and withdraw when the time comes. This force is appropriately called a Detachment Left in Contact (DLIC).
The DLIC is a smaller element of the overall security force. As the name suggests, it is the last force to initiate the withdrawal. Truthfully, there is no more difficult mission a unit could be assigned. This unit must be prepared to attack, defend, delay, etc…. The challenge is that the unit leadership will have little time to decide. Make the wrong decision and the results could be catastrophic.
To achieve the above, the security force/DLIC must be a self-contained, combined arms organization. They must possess the lethality, the multipliers to enhance the lethality, and the logistical support to accomplish their critical tasks. Depending on the organization, a cavalry unit is certainly well-suited for the mission. If that is not an option, a commander and his staff must be creative. The formation of the security force must be the first decision made in terms of organization. The other pieces fall into place from there. In terms of total strength, it is not uncommon for the security force to total at least 1/3 of the unit’s overall combat power
Reserve – Often overlooked is the necessity to designate a reserve during the execution of the withdrawal. As you delve more into this article; you will readily see what a fluid and rapidly changing operation a withdrawal this. Because of this, a commander must have a reserve to utilize if the situation dictates. In the withdrawal, there are several situations that could arise where a reserve could be the difference between mission failure and success. These include: 1) An enemy flank attack on the main body 2) Assisting the DLIC or other security forces in breaking contact with the enemy 3) Defeating possible enemy attacks at the final assembly area.
Main Body – After determining the composition of your security force and reserve; the remainder of the unit is essentially your main body. Depending on the time you have available; you want to posture your main body units in locations that facilitate the overall withdrawal. Thus, position those units that you want to withdraw first in locations that enable them to withdraw first. These units would include: 1) Assets to conduct reconnaissance of the next position 2) Assets to prepare the next position for occupation 3) Combat Service Support assets to facilitate the withdraw 4) A security force to secure the next position 5) Indirect fire assets not needed to support the forward security force 6) Any non-essential units that could clog up your withdrawal routes.
Control Measures
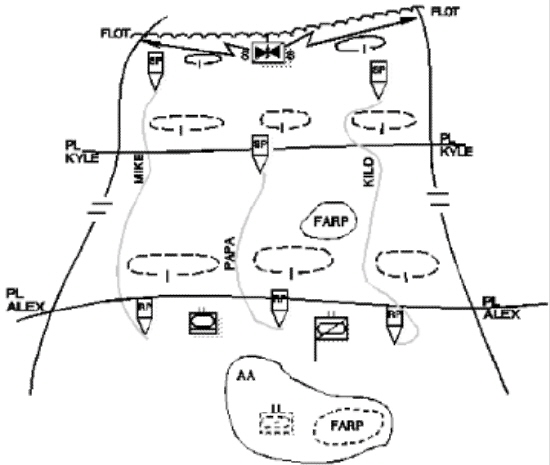
During planning, one of the most important actions is to develop the control measures you will utilize to command and control the withdrawal. As discussed earlier, the withdrawal can be a highly fluid operation. Because of this, it is necessary to establish some well-defined and analyzed control measures. Just as importantly, these control measures must be understood and placed in the hands and minds of the units that will utilize them.
Below you will find a list of potential control measures a commander and his staff may utilize and why they are important.
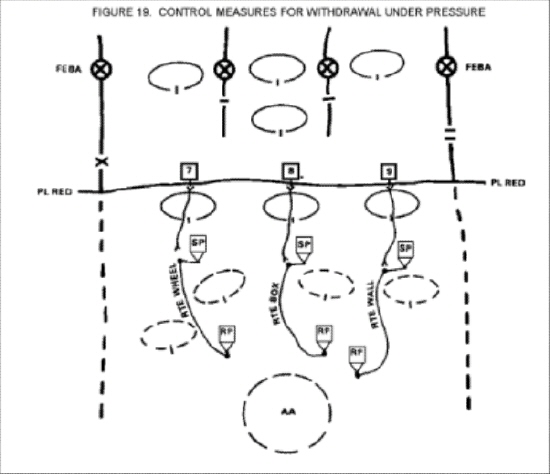
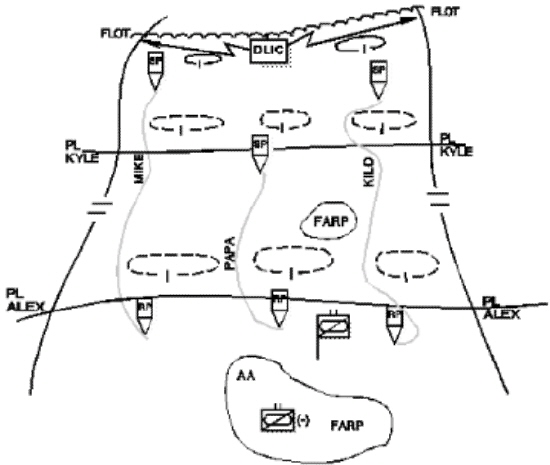
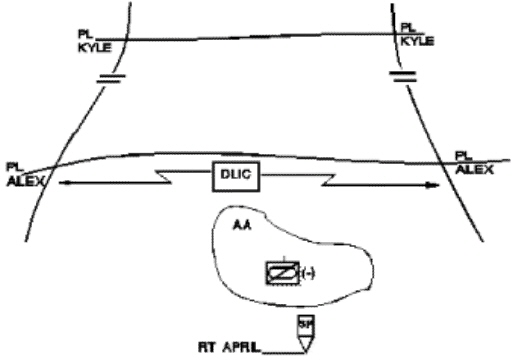
From Phase Line Red to the FEBA (Forward Edge of the Battle Area) is essentially the battle space your security forces are occupying. Within this area, it is critical you have control measures that facilitate defensive operations. This is vital because it is likely your security forces will engage the enemy. Thus, control measures such as sectors/boundaries, battle positions are imperative.
As the situation develops, it may be necessary for elements of the security force to withdraw. Because this is such a chaotic period, it is fruitful to preplan passage of lines control measures. This will facilitate any future passage of lines that the security force would execute. In the above diagram, you will see three passage points (7, 8, and 9) and routes through occupied battle positions have been established.
To set the conditions for the actual withdrawal of the main body, control measures are essential. Without them, chaos would be inevitable. Typical control measures in this period are initial battle positions, be-prepared battle positions to occupy if the situation warrants, be-prepared positions for your reserve to occupy, sufficient maneuver routes to withdraw (these include start points and release points), alternate maneuver routes to prepare for contingencies, phase lines and checkpoints in order to monitor and control maneuver, and a final assembly area for units to eventually occupy.
As in any operation, these control measures must be made available and understood by the units conducting the withdrawal!
Preparing The Withdrawal
Once a viable plan is set, a unit must use their preparation time to its’ fullest! In the case of a withdrawal, this time could be extremely limited. There are several actions you should strive to conduct which will greatly assist you during the actual execution of the withdrawal. These include:
- Rehearsals are critical at all levels. Time and the enemy situation may make a full dress rehearsal impossible. However, there are several other rehearsal techniques that are far less resource intensive.
- The more reconnaissance of routes and the final assembly area you can conduct the better!
- Pre-position supplies along the routes you will utilize. This can pay huge dividends during the withdrawal.
- Continue to conduct aggressive intelligence and surveillance of the enemy during your preparation. Obviously, you are looking for indicators of your foe’s intentions and windows of opportunity for your withdrawal.
- Coordination, Coordination, Coordination! Take all available time to work out details with all units involved in the withdrawal.
- The emplacement of obstacles during the preparation phase is critical and must be well-planned. It must be understood that any emplaced obstacles within the entire sector could possibly impact the withdrawal of forces.
Executing The Withdrawal
As in any mission, the execution of a withdrawal is not a lock-step process. As highlighted earlier, in a retrograde operation the change from the various types of retrograde (withdrawal, delay, retirement) can occur quickly. In fact, depending on the size of the unit, it is likely different elements within the unit can be conducting different types of the retrograde.
For the purposes of this article, we thought we would provide you a sequence of a withdrawal (one going as planned!) so you can see how the pieces connect.
- A small group of forces maneuver to the planned assembly area. Their purpose is to initially secure the assembly area. Once secured, they will conduct reconnaissance to better prepare the area for future occupation.
- Once the assembly area is secured, quartering parties from the main body units begin maneuvering from their forward positions into the assembly area. The purpose of the quartering parties (small elements – 1 to 3 vehicles from each principle main body unit) is to set the conditions for a smooth occupation of the rest of the main body. These tasks can include marking positions for occupation, formulating a rough defensive plan, pre-planning indirect fire targets, and preparing the incoming unit for logistical resupply. The best way to maneuver quartering parties into the assembly area is through infiltration (a few vehicles at a time). Moving all the quartering parties at once can make for a large target and show your hand early to the enemy.
- As quartering parties begin moving to the assembly area, portions of the security force should begin moving rearward as well. The timing and number of forces that will maneuver rearward is obviously situation dependent. These forces will normally move to the forward trace of the main body.
- Based on the plan, begin maneuver of your main body forces to the assembly area. As we discussed earlier, get your non-essential units out first. As these forces arrive at the assembly area, they are met by their quartering parties to ensure a smooth occupation into their positions. The reason why non–essential units move first is in case your security force can’t delay a pursuing enemy, you have available forces to assist. When maneuvering the main body, utilize as many routes as possible. As the maneuver begins, command and control must reign supreme. The Commander must ensure there are no bottlenecks or vice versa a lag in maneuver to the assembly area. Either situation can have disastrous impact on the withdrawal.

- As the main body begins the withdrawal, the reserve must be prepared to assist the security force in delaying the enemy or main body units in their withdrawal. Consequently, the reserve must be positioned to meet these contingencies.
- As the initial elements of main body enter the assembly area, the forward elements of the main body will begin maneuver rearward. As they depart their positions, elements of the security force will withdraw and can occupy those vacant positions. As this occurs, the reserve will occupy a new position closer to the assembly area.
- As the preponderance of the main body enters the assembly area, the most challenging phase of the retrograde begins. It is at this time the security force begins their retrograde in earnest. As discussed earlier, it is likely some elements of the security force have begun some initial withdraw actions to the rear. If that has occurred, the unit likely has a DLIC (Detachment Left in Contact) left forward. Thus, the challenge is two-pronged. First, you must resume the withdrawal of the initial elements of the security force. Second, you must now maneuver your DLIC (your remaining forces forward) towards the assembly area. This maneuver could be a withdrawal or a delay (making the challenge even more challenging!). To aid in the maneuver, a commander must ensure his reserve is positioned if assistance is required.
- The initial elements of the security force are met at the final assembly area by their unit’s quartering party. The critical factor for this force is to refit, refuel, and rearm them. As they are met, the DLIC should be continuing their maneuver rearward. During this period, the commander should be utilizing all assets he has at his disposal to assist the DLIC. It is likely the critical asset in this will be the unit’s fire support assets. Well-placed indirect fire can buy the DLIC the time it needs to reach the assembly area. As the DLIC begins reaching the assembly area, the unit must ensure it keeps contact with the enemy. You can’t become blind to the enemy. Nothing good comes of this!
- Once the DLIC reaches the assembly area it is met by the quartering party and immediately executes logistical operations. With the entire unit (minus recon forces that are still in contact with the enemy) now in assembly area, several actions must occur. First, the unit as a whole must be prepared defensively to counter any enemy attacks. Depending on the enemy’s pursuit of the DLIC this could be inevitable. Second, the unit must now prepare itself for future operations. Certainly, the best option is to conduct some form of offensive operations to regain the initiative. However, if the conditions are not right, then a defense may be required. It is not out of the realm of possibility that another retrograde operation may be needed. If that is the case, the planning and preparation begin once more!
Summary
To summarize this month’s topic, we thought there was no better expert to reflect on lessons learned regarding the withdrawal than Friedrich Wilhelm von Mellenthin. During World War II, von Mellenthin served in nearly every campaign the German Army fought. Von Mellenthin aptly discusses these campaigns in his superb book, Panzer Battles. Within Panzer Battles he describes at great length the German Army’s experience in planning and executing withdrawal operations.
Below you will find von Mellenthin’s thoughts on the withdrawal as shared in Panzer Battles. The vast majority of his recommendations are still extremely relevant today.
- First thorough preparations must be made:
- Roads, bridges, tracks, and river crossings must be systemically improved, assembly areas for troops chosen and camouflaged, and elaborate calculations made to determine what equipment and material can be moved, and what transport would be required.
- All telephone lines must be removed – a vital precaution – and command posts and battle headquarters established in the rear before movement begins.
- Demolitions, road blocks, and minefields must be designed to fit in with the plan for delaying actions on a specific line of resistance.
- The gravest problem was the evacuation of civilians. A mass migration of this sort had not been foreseen by the German military authorities, and to cope with it a special organization had to be improvised.
- The main thing was to canalize the movement, but to direct it off the main lines of withdrawal of tracks and routes.
- Engineers and construction detachments must be sent to build bridges and roads to enable these masses to keep going in orderly fashion.
- Supply and ration centers must be organized; medical and veterinary aid posts can not be forgotten.
- The most important point is traffic control. As long as the civilians were near the front line, their moves took place by night. If day moves were inevitable, the refugees were taught to avoid bunching together and move in dispersed order as a protection against Russian aircraft.
- In modern war, long-range planning and detailed preparations have to be made to help the civil population in their flight; otherwise the movements of troops will be brought to a complete standstill.
- In modern war there is no such thing as a purely military withdrawal; the civil population has to be included in any plans for a retreat.
- It is essential to keep secret the intention to withdraw, and to conceal the retreat as long as possible after it has started.
- The real difficulty starts when the forward troops are drawn out of the line. They must get out immediately after dark, without making any noise, and their first bound should be as far back as possible. On no account should they form columns of more than battalion strength and each company must move as a separate unit.
- The enemy must be denied the use of airfields or landing strips at all costs; at the same time they must remain operational for one’s own aircraft up to the very last moment and then be thoroughly blown up.
- A withdrawal of this kind, harassed by the enemy and carried out in the greatest hurry, does not absolve commanders from their duty to maintain order and discipline. This depends partly on the example and leadership of the officers, and partly on their ability to keep their heads and improvise some sort of plan. Even in a hurried withdrawal there is much that can be done.
- Engineers must guard and keep intact all bridges and prepare their demolition; construction units have to be handy to repair roads and tracks; recovery parties with tractors must be placed along the routes to keep vehicles and guns on the move or to pull casualties off the road.
- Antiaircraft guns have to be stationed at crossroads and important bridges and defiles.
- Fighter protection, if available, should be provided to cover the main arteries of the withdrawal.
- Traffic control points should be numerous, and are indispensable at road crossings, at bridges, and in narrow lanes. There must be a number of officers, including high-ranking ones, in charge of control points. This is important, as the military police NCO is unable to wield enough authority in withdrawals of this kind.
- So as to avoid chaos, the responsible commanders must issue clear orders, stating which units are to destroy their heavy weapons and vehicles.
His most critical comment regarding withdrawal and the German Supreme Command follows:
“During World War II, the German Supreme Command could never decide on a withdrawal while the going was good. It made up its mind either too late or when a retreat had been forced upon our armies and was already in full swing. The consequences of this stubbornness were usually disastrous for the commanders and the troops.”
Next Month
In part two of our discussion of retrograde operations we will concentrate on delay. This operation, to many, is the most difficult mission to accomplish. It is the ultimate challenge in terms of command decision-making. Stay in contact too long with your opponent and you face decisive engagement. Do not synchronize the use of all your combat multipliers and you will fail. It is truly a complex operation!
One does not have to look far or abroad to find experts for the most difficult military task: Withdrawal under fire. Confederate General William Joseph Hardee is an acknowledged expert. Here an excerpt gleaned from the Internet.
By the way: descendent of the Hardee family live in Fernandina Beach, Florida.
Gerhardt Thamm
William Joseph Hardee
(Supplemental Biography From The Confederate Military History)
Lieutenant-General William J. Hardee was born in Camden county, Georgia, in November, 1815. After receiving a military education at West Point, he entered the army with the class of 1838, as a second-lieutenant of the Second cavalry, and was promoted first-lieutenant in 1839, and served in the Florida war of 1840. He was then sent to Europe by the government as a member of a military commission to study the organization of foreign armies, and in that capacity visited the military school at St. Maur, France.
In 1844 he was promoted captain, and in 1846 crossed the Rio Grande with General Taylor. He behaved with gallantry in the Mexican war, was taken prisoner at Curricito, but exchanged, and for his valor at La Hoya was brevetted major. In 1853 his professional accomplishments caused his selection by the secretary of war, for the compilation of a system of infantry tactics, which was adopted in March, 1855. In the following year “Hardee’s Tactics” was introduced at West Point, where he was appointed commandant with the rank of lieutenant-colonel. In 1861 he resigned this commission and entered the Confederate service as colonel of cavalry March 16th, being assigned to command at Fort Morgan, Ala. On June 17th, he was promoted to brigadier-general, in which rank he organized a brigade of Arkansas regiments, and operated in that State until called with his men across the Mississippi, when he was commissioned major-general and put in command of a division of the army in Kentucky and Tennessee under Albert Sidney Johnston. He led the advance from Corinth in command of the Third army corps, and commanded the first line of attack at Shiloh, where he was wounded, but managed his command with such energy that he was promoted major-general.
In the following summer he was put in immediate command of the army of the Mississippi, afterward called the army of Tennessee, and during the Kentucky campaign he commanded the left wing of Bragg’s army. In the battle of Perryville he bore a conspicuous part, and he was immediately afterward promoted to the rank of lieutenant-general. At the battle of Murfreesboro the left wing under his masterly leadership was successful in the fight, and he was especially commended by General Bragg “for skill, valor and ability.”
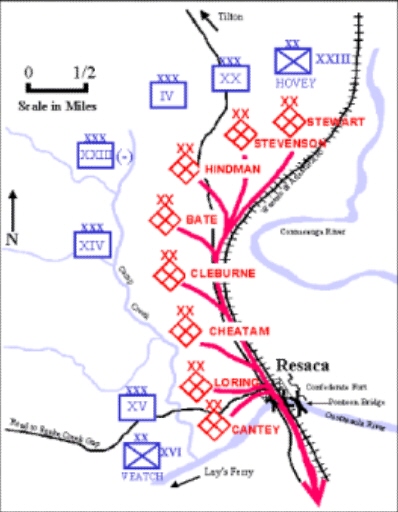
General Hardee had now well earned the exalted rank which he held and a military reputation which was tersely expressed by his soldiers in the cognomen “Old Reliable.” In 1863 he was detailed to defend Mississippi and Alabama, but returned to the command of his corps at Chattanooga, and commanded the right wing at Missionary Ridge, where General Thomas declared he was “the most efficient general the Confederacy had on the field.” The subsequent maneuver of his troops at Cassville and his masterly retreat in echelon of divisions won the renewed admiration of his opponents. On December 2, 1863, he succeeded General Bragg in command of the army, but soon turned this over to General Polk, who in turn gave place to Gen. J. E. Johnston. Under the latter and his successor, J. B. Hood, he commanded a corps of the army of Tennessee through the Atlanta campaign, taking a prominent part in the fighting at Resaca, Kenesaw Mountain, and other points, and particularly at Peach Tree Creek and the battle of July 22d, where he commanded the flank movement against the Federal left wing. His corps was again engaged at Jonesboro and the last fighting of the campaign.
In October, 1864, he was assigned to command the department of South Carolina, Georgia and Florida, with the task of collecting at Savannah forces to operate against Sherman’s advance. The troops he required were no longer to be found in the South, and by one of the most masterly retreats of the war he evaded Sherman’s overwhelming force before Savannah, and withdrew to Charleston and thence to Columbia. At Averysboro, in March, 1865, he punished the enemy effectively, and a few days later he led in the battle of Bentonville the last charge that was made by the Confederacy’s war-worn soldiers, and his only son, sixteen years of age, was among the last to fall. In this last battle of the four years, with undiminished spirit, the general, as Johnston has described it, “with his knightly gallantry dashed over the enemy’s breastworks on horseback in front of his men.” It is told of General Hardee, illustrating his thoroughness as a soldier, that he was the only lieutenant-general who personally inspected the arms and accoutrements of each soldier of his corps. General J. E. Johnston said of him that “he was more capable of commanding twenty thousand men in battle than any other Confederate general.” General Hardee died at Wytheville, Va., November 6, 1873, and his remains were interred at Selma, Ala., where he had resided after the war.